A Step-by-Step Guide on How to Remove Drawers with Bottom Metal Glides
Taking out drawers with bottom metal glides can seem like a tricky task at first. But don't worry, with a little guidance, you can do it without any hassle. This guide will walk you through the different types of drawers, what you need to prepare, and the steps to remove those with bottom metal glides. You'll also find tips on dealing with any issues that might pop up along the way. So, let's get started!
Key Takeaways
- Always figure out the type of drawer slide before starting.
- Make sure the area around the drawer is clear for easy removal.
- Use the correct tools to avoid damaging the drawer or furniture.
- Handle metal-glide drawers with care to avoid damaging the tracks.
- Check for any screws or levers that might be securing the drawer.
Understanding Drawer Types and Mechanisms

Identifying Different Drawer Slides
When it comes to drawers, understanding the different types of slides is key. Wood-glide slides are typically found in older furniture, using a basic groove or rail system. These can be a bit clunky but are straightforward to work with. On the other hand, metal-glide slides, which are more common in modern pieces, often feature a lever mechanism that makes removal easier. Then there are proprietary slides, unique to certain brands, which might have special levers or tabs for unlocking the drawer.
Common Drawer Stop Mechanisms
Knowing how drawer stop mechanisms work is important for safe removal. Here are a few common types:
- Twist Mechanisms: Often seen in wood-glide drawers, these prevent the drawer from being pulled out entirely.
- Lever Mechanisms: Found in metal-glide drawers, they allow for easy disengagement.
- Anti-Tip Cables: These are safety features that stop multiple drawers from opening at once, keeping everything stable.
Recognizing Proprietary Slides
Proprietary slides can be a bit of a puzzle. They’re designed by specific brands and can vary widely in how they function. Some might have extra components or unique designs that require a bit of patience and a keen eye to figure out. Always check the manufacturer’s instructions if you can find them, as these slides might need a specific method to unlock or remove.
Preparing for Drawer Removal

Before you dive into removing drawers with bottom metal glides, it's important to get everything set up properly. A little preparation can make the whole process smoother and safer.
Clearing the Area Around the Drawer
- Empty the drawer: Make sure to take everything out of the drawer. This prevents any items from getting damaged or causing an obstruction.
- Check for hidden items: Sometimes things get stuck at the back. Double-check to avoid surprises.
- Organize your space: Keep the contents somewhere safe and tidy so you can easily put them back later.
Gathering Necessary Tools
Having the right tools on hand is crucial. Here's what you'll need:
- A Phillips screwdriver for most screws you'll encounter.
- A flashlight to help you see into dark corners and tight spots.
- Pliers for gripping and pulling as needed.
- A small container to keep screws and small parts from getting lost.
Preparation is key! By taking a few minutes to gather your tools and clear the area, you'll save yourself a lot of hassle later on.
Checking for Obstructions
- Make sure there's enough room to work comfortably. You don't want to bump into things while handling the drawer.
- Look around the furniture for anything that might get in the way. Move items if necessary to create a clear workspace.
- Ensure that nothing is blocking the path of the drawer, both inside and outside.
By following these steps, you'll set yourself up for a successful and hassle-free drawer removal experience. Remember, a little preparation goes a long way in making the job easier and more efficient.
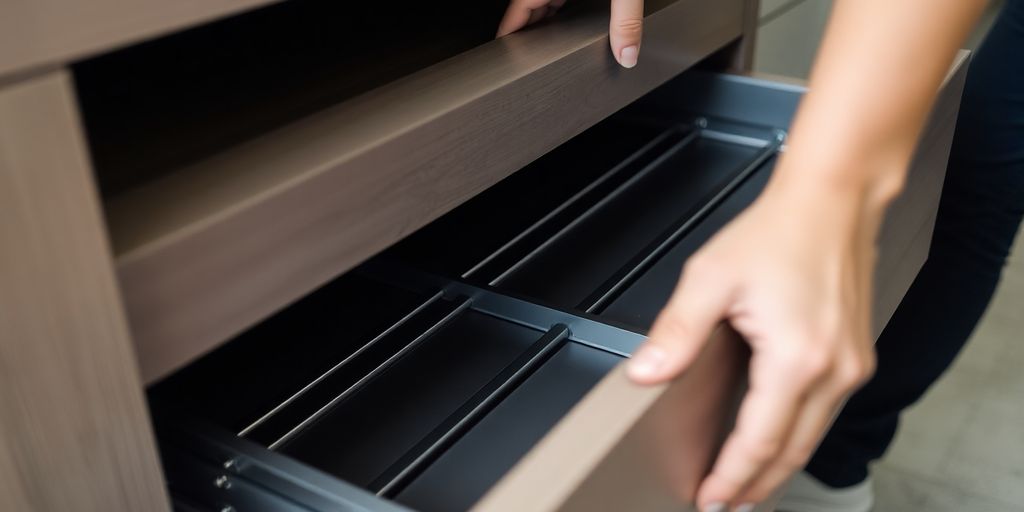
Removing Metal-Glide Drawers with Levers
Removing drawers with metal glides and levers can be a bit tricky, but once you get the hang of it, it's pretty straightforward. Here's a simple guide to help you out.
Locating the Track Levers
First things first, open the drawer all the way. Look for the track levers on both sides of the drawer. These are usually found in the middle of the track and might be straight or slightly curved. Their job is to keep the drawer in place until you decide to remove it.
Disengaging the Levers
- Press down on each lever while gently pulling the drawer towards you. This action releases the drawer from the track.
- Make sure to press both levers simultaneously; otherwise, the drawer might not come loose.
- If the levers are tough to press, check for any obstructions or debris that might be blocking them.
Pulling the Drawer Free
Once the levers are disengaged, you can pull the drawer out. If you feel any resistance, double-check that both levers are fully pressed down. After removing the drawer, it's a good idea to clean the tracks and inspect them for any wear and tear.
Remember, handling metal-glide drawers gently will help prevent damage to both the drawer and the track system. Taking your time with this process can save you a lot of headaches later on.
By following these steps, you can effectively remove metal-glide drawers with levers, making your task much easier! For those interested in upgrading or replacing hardware, explore a wide range of window hardware products that might suit your needs.
Handling Drawers with Stabilizer Screws
Finding the Stabilizer Screws
First things first, you need to find those pesky stabilizer screws. Slide the drawer out as far as it will go without forcing it. Look at the bottom of the tracks, right at the end. That's where you'll usually find the screws holding the two halves of the track together. These screws are crucial for keeping the drawer stable and secure.
Removing the Stabilizer Screws
Got your screwdriver ready? Great! Most of these screws are about 2 inches long and need a Phillips head screwdriver. Turn them counterclockwise to loosen them up and then pull them out. Make sure to keep them in a safe spot so they don't roll away under the couch or something.
Separating the Track Halves
Now that the screws are out, it's time to separate the track halves. Lift up on the catch tabs to get the two halves apart. This is the part where you need to be gentle. You don't want to bend or damage the tracks. Once they're apart, the drawer should move past the stopping mechanism easily.
Tip: Drawers with stabilizer screws can be unexpectedly heavy. When you're pulling the drawer out, be prepared for the weight. Keep it straight to avoid it getting jammed.
Once you've got the drawer free, you can set it down and move on to whatever project you've got planned next. Whether it's cleaning, fixing, or just rearranging, you're all set to go!
Dealing with Anti-Tip Cables
Identifying the Anti-Tip Cable
First things first, you gotta spot the anti-tip cable. These cables are a safety feature to keep your furniture from tipping over when you open multiple drawers. Look at the back of the drawer after pulling it out as far as it goes. You'll see a small metal cable connecting the drawer to the furniture's body. It's usually attached to the top or bottom drawers through specific inserts or eyelets.
Unscrewing the Anti-Tip Cable
Once you've found the cable, it's time to get it loose. Grab a screwdriver, usually a Phillips head works best, and take out the screws holding the cable. There might be one or two screws, so keep an eye out. Turn them counterclockwise until they're loose enough to remove by hand. It’s a good idea to keep these screws in your pocket or a safe spot so they don’t vanish on you.
Removing the Drawer with Cables
After the cable is free, you can pull the drawer out completely. Stand in front of the furniture, make sure there's enough space for the drawer to come out, and then pull. If there are disconnect tabs, press and hold them as you pull. This step might need a bit of force, especially if the drawer is heavy or the tracks are stiff. But once the cable's out of the way, it should slide out without too much trouble.
Remember, when dealing with multiple drawers, always start from the top and work your way down. This keeps the weight at the bottom and prevents any wobbling or tipping over.
Troubleshooting Common Drawer Removal Issues
Dealing with Stuck Drawers
Getting a drawer stuck can be frustrating, but don't worry, there are ways to tackle this issue.
- Check for Obstructions: Take a peek inside the drawer. Sometimes, loose items or papers can jam the drawer shut.
- Inspect the Tracks: Look at the tracks for any bends or damage. A small dent can cause a big problem.
- Pull Gently: Try pulling the drawer out slowly while wiggling it side to side. This might help it slide out smoothly.
Identifying Hidden Mechanisms
Drawers can have hidden mechanisms that keep them in place.
- Look for Levers: Check the sides of the drawer for any levers or clips that might need to be pressed or pulled.
- Examine for Screws: Sometimes, there are screws hidden underneath or behind the drawer that need to be removed.
- Test Movement: Gently push or pull the drawer to see if it reveals any hidden mechanisms.
Resolving Resistance During Removal
If the drawer feels like it's resisting, here's what you can try:
- Lubricate the Tracks: A little bit of lubricant can make a big difference. Apply some to the tracks to help the drawer slide better.
- Adjust the Alignment: Check if the drawer is aligned properly. Misalignment can cause friction and resistance.
- Try Tilting: Sometimes, tilting the drawer up or down can help it clear any obstacles and come out smoothly.
Remember, patience is key when troubleshooting drawer issues. Take your time to identify the problem before forcing anything.
By following these tips, you'll be able to handle most common drawer removal issues without too much hassle.
Best Practices for Drawer Maintenance
Regular Cleaning of Drawer Tracks
Keeping your drawer tracks clean is essential for smooth operation. Dust and debris can accumulate over time, causing friction and making it hard to open or close the drawer. Make it a habit to wipe down the tracks every few months with a damp cloth. If there's stubborn grime, a little bit of mild soap can help. Just be sure to dry everything thoroughly to prevent rust.
Inspecting for Wear and Tear
Regular checks for any signs of damage or wear can save you a lot of trouble down the line. Look for cracks, bends, or any unusual noises when using the drawer. If you notice any issues, it's best to address them sooner rather than later. Sometimes, a simple adjustment is all it takes to fix the problem, but other times you might need to replace parts like the WRS Die Cast Pivot Bar if it's causing the drawer to malfunction.
Lubricating Metal Glides
A little lubrication goes a long way in keeping your drawers gliding smoothly. Use a silicone-based lubricant or a special drawer glide lubricant, applying it sparingly to avoid attracting dust. Remember, too much can do more harm than good. Apply the lubricant to the metal parts and test the drawer to ensure it moves effortlessly.
Regular maintenance not only prolongs the life of your drawers but also keeps them functioning like new. It's about taking small steps to prevent bigger problems later.
Wrapping It Up
So there you have it, a straightforward guide to removing drawers with bottom metal glides. It might seem a bit daunting at first, but once you get the hang of it, it's really not that bad. Just remember to take your time, follow the steps, and keep an eye out for those levers and screws. With a little patience, you'll have those drawers out in no time, ready for whatever project or cleaning task you have planned next. And hey, if you run into any trouble, don't hesitate to revisit the steps or seek a bit of extra help. Happy drawer removing!
Frequently Asked Questions
How do I identify the type of drawer slide I have?
Look for visible mechanisms on the sides or bottom of the drawer. Metal-glide slides often have levers, while wood-glide slides usually have a simple rail system.
What should I do if my drawer won't come out?
Check for any levers, screws, or cables that might be holding the drawer in place. Make sure to gently wiggle or lift the drawer to see if it can be freed.
Can I remove drawers with anti-tip cables by myself?
Yes, but it's important to unscrew the cables carefully. Make sure you have a Phillips-head screwdriver handy, as these screws are common for anti-tip cables.
What tools do I need to remove a drawer with metal glides?
You'll usually need a Phillips-head screwdriver to remove any screws and possibly a flashlight to see into dark areas.
How can I prevent damaging the drawer tracks?
Always handle the drawer gently and avoid forcing it. Check for any obstructions and ensure all levers or screws are disengaged before pulling the drawer out.
Why is my drawer stuck even after removing screws and levers?
There might be hidden mechanisms or debris causing resistance. Double-check for any missed components and clear out any visible obstructions.