Essential Guide to Choosing the Right Shower Door Seal for Your Bathroom
Choosing the right shower door seal is more important than you might think. These seals play a vital role in keeping your bathroom dry and preventing leaks. With various options available, it can be a bit overwhelming to figure out which one is the best fit for your shower. This guide breaks down everything you need to know about selecting and installing the perfect shower door seal for your bathroom.
Key Takeaways
- Different seals exist for various shower shapes: straight for square doors, rounded for curved.
- Measure your glass thickness accurately to ensure a proper fit.
- Consider where you’ll install the seal; it varies for bottom and side placements.
- Gather essential tools like a utility knife and tape measure for installation.
- Regularly check and maintain your seal to prevent leaks and extend its life.
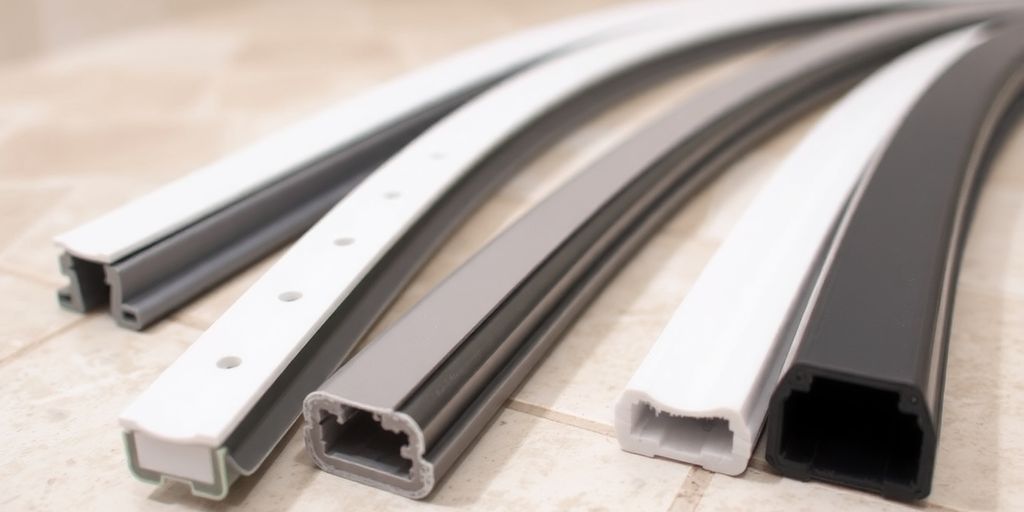
Understanding Different Types of Shower Door Seals
Choosing the right shower door seal can feel overwhelming, but it doesn't have to be! There are a few main types, and understanding their differences is the first step to a leak-free bathroom. The type of seal you need depends on your shower door's design and how it closes. Let's break down the most common options:
Straight Seals for Square Doors
These are your basic, no-frills seals. They're designed for shower doors with straight edges, typically found in square or rectangular shower enclosures. They're usually made of vinyl or rubber and slide onto the edge of the glass. Think of them as a simple barrier to stop water from escaping. When selecting, pay attention to their dimensions and shape. If you have an old seal, it is worth choosing a model based on that construction. Here's what to keep in mind:
- Easy to install - often just slide or snap on.
- Affordable and widely available.
- Best for showers with minimal gaps.
Rounded Seals for Curved Doors
Got a curved shower door? Then you'll need a rounded seal. These are designed to follow the curve of the glass, ensuring a snug fit and preventing water from sneaking through. Curved seals are a bit more specialized than straight seals, so you might have fewer options to choose from. For example, to protect the gap at the bottom edge of the half-round shower door with a thickness of 5 mm, the recommended models are UK13 or UK18. Both shower seals are curved and have wings that protect the gaps from water leakage.
- Specifically shaped for curved enclosures.
- May require more precise installation.
- Essential for preventing leaks in curved showers.
Magnetic Seals for Complete Closure
If you want the ultimate in water-tightness, magnetic seals are the way to go. These seals have magnets embedded in them, so when the door closes, the magnets attract and create a super-strong seal. This is especially useful for frameless shower doors where there's no frame to help keep the water in. Built-in magnet with a force of 24 N/cm makes seals perfectly adhere to each other. Magnetic seals can be combined at a 90° or 180° angle. You can use bottom sweep seals, side seals, door jamb seals, or hinged side seals. Each type is designed for specific areas of the shower door.
- Provide the most secure seal.
- Ideal for frameless showers.
- Can be a bit pricier than other options.
Choosing the right seal depends on your shower's design and your priorities. Consider how much water you need to keep in, how easy you want the installation to be, and your budget. Don't be afraid to shop around and compare different options before making a decision. Remember, old seals can lead to leaks and water damage.
Key Factors to Consider When Choosing a Shower Door Seal
Choosing the right shower door seal can feel overwhelming, but it doesn't have to be! There are a few key things to keep in mind that will make the process much easier. It's not just about picking something that looks good; it's about finding a seal that actually works for your specific shower.
Glass Thickness Measurement
First things first, you absolutely need to know the thickness of your shower glass. This is probably the most important measurement you'll take. Seals come in different sizes to accommodate different glass thicknesses, and if you get this wrong, the seal simply won't fit properly. It'll either be too loose and leak, or too tight and be impossible to install. Grab a tape measure or even a caliper if you have one, and get an accurate reading. You can usually find this information in the shower door's manual, if you still have it. If not, measure carefully!
Installation Location
Where exactly on the shower door will the seal be installed? Is it along the bottom, the side, or the top? Each location might require a different type of seal. For example, a bottom sweep seal is designed to prevent water from escaping under the door, while a side seal fills the gap between the door and the wall. Think about where you're experiencing the most leaks and choose a seal designed for that specific area.
Shower Type Compatibility
Is your shower door straight or curved? Framed or frameless? The type of shower you have will dictate the type of seal you need. A straight seal won't work on a curved door, and a seal designed for a framed shower might not fit a frameless one.
Consider the overall design of your shower when choosing a seal. A sleek, frameless shower might benefit from a minimalist seal, while a more traditional framed shower can accommodate a wider, more noticeable seal.
Here's a quick rundown:
- Framed Showers: Offer more flexibility in seal choice.
- Frameless Showers: Require seals that attach directly to the glass.
- Curved Showers: Need flexible, curved seals.
Essential Tools for Shower Door Seal Installation
Okay, so you're ready to swap out that old, leaky shower door seal? Awesome! But before you jump in, let's make sure you've got all the right tools. Trust me, having these on hand will make the whole process way smoother. Nothing's worse than getting halfway through and realizing you're missing something simple.
Utility Knife for Cutting
First up, you'll need a good utility knife. This isn't your butter knife from the kitchen drawer; we're talking about something with a sharp, replaceable blade. A utility knife is key for precisely cutting your new seal to the correct length. You want clean cuts to ensure a snug fit, so don't skimp on this one. A dull blade will just make things frustrating, and you'll end up with jagged edges. Be careful when using it, of course!
Tape Measure for Accuracy
Next, grab a tape measure. Accuracy is super important here. You need to measure the shower door opening precisely to know how long to cut the new seal. Measure twice, cut once, as they say! Jot down those measurements so you don't forget. You might even want to write them directly on the seal before you start cutting. This will help prevent mistakes and wasted material. You can find replacement seals online if you mess up, but it's better to get it right the first time.
Cleaning Supplies for Preparation
Don't underestimate the importance of cleaning! Before you even think about sticking that new seal on, you need to clean the area where it will go. We're talking about removing any old adhesive, soap scum, or mildew. A good cleaning spray and a rag will do the trick. Make sure the surface is completely dry before applying the new seal. A clean surface ensures the adhesive will stick properly, giving you a watertight seal. Nobody wants leaks!
Step-by-Step Guide to Installing Your Shower Door Seal
Cutting the Seal to Size
Okay, so you've got your new shower door seal. First things first, you need to cut it to the right size. Measure the length of the shower door where the seal will be installed. Use a tape measure for accuracy. It's better to cut it a little longer than needed at first; you can always trim off the excess later. I usually use a utility knife for this, but a sharp pair of scissors can also work. Just make sure you're cutting on a stable surface and be careful not to slice your fingers! Remember to account for any overlaps or specific angles needed for a snug fit. This part is crucial, so take your time and double-check your measurements. You can always refer to accurate measurements to ensure a perfect fit.
Applying the Seal Correctly
Now for the fun part – sticking the seal on! Before you do anything, clean the area where the seal will go. Get rid of any old adhesive, grime, or soap scum. A clean surface is key for the seal to stick properly. Peel off the backing from the adhesive strip on the seal. Carefully align the seal with the edge of the shower door. Press it firmly into place, working your way along the entire length. Make sure there are no gaps or air bubbles. If you're using a seal that requires silicone caulk, apply a thin bead of caulk along the edge of the seal after it's in place. This will help create a waterproof barrier. I find that using a wet finger to smooth out the caulk gives it a nice, clean finish.
Ensuring a Tight Fit
Alright, you've got the seal on, but is it really on? Give it a good once-over. Check for any spots where it's not making full contact with the door or the shower frame. If you see any gaps, try pressing the seal more firmly in those areas. If that doesn't work, you might need to add a bit more silicone caulk to fill the gaps. Also, make sure the seal isn't interfering with the door's movement. The door should open and close smoothly without catching on anything. If the seal is too long or too thick, trim it down a bit with your utility knife. A tight fit is what you're after, so don't be afraid to make adjustments until it's just right.
After installation, it's a good idea to let the silicone caulk dry completely before using the shower. This usually takes about 24 hours. This will ensure that the seal is fully waterproof and prevent any leaks.
Testing and Maintaining Your Shower Door Seal
Checking for Leaks After Installation
Alright, you've put in the new seal. Now comes the fun part: making sure it actually works! The most important thing is to check for leaks immediately after installation.
Here's a simple way to do it:
- Close the shower door completely.
- From outside the shower, run water along the seal area for a few minutes. Pay close attention to the corners and edges.
- Check the floor outside the shower for any water. Even a little bit means the seal isn't doing its job.
If you find leaks, don't panic! It might just need a small adjustment. If you have persistent leaks, you might need to apply some silicone caulk to seal any gaps.
Regular Maintenance Tips
To keep your shower door seal in good shape and prevent future headaches, a little regular maintenance goes a long way. Think of it like changing the oil in your car – a small effort that prevents big problems down the road.
Here are some easy tips:
- Clean the seal regularly. Use a mild soap and water solution to wipe down the seal. This prevents the buildup of grime, mold, and mildew.
- Inspect the seal every few months. Look for any signs of wear and tear, like cracks, tears, or discoloration.
- Dry the seal after each shower. This helps prevent mold and mildew growth.
Regular maintenance can significantly extend the life of your shower door seal. It's a small investment of time that can save you money and hassle in the long run.
Signs That Your Seal Needs Replacement
Even with the best care, shower door seals don't last forever. Knowing when it's time for a replacement can prevent water damage and keep your bathroom looking its best.
Here are some telltale signs:
- Visible damage: Cracks, tears, or significant discoloration are clear indicators that the seal is past its prime.
- Water leaks: If you're noticing water escaping from the shower, even after cleaning and adjusting the seal, it's likely time for a new one.
- Mold or mildew: If you can't get rid of mold or mildew, even with regular cleaning, it might be embedded in the seal itself. This is a health hazard and a sign that the seal needs to go.
Benefits of Replacing Your Shower Door Seal

Okay, so you're thinking about swapping out that old shower door seal? Good call! It might seem like a small thing, but a fresh seal can make a surprisingly big difference. Let's get into why it's worth the effort.
Preventing Water Leaks
This is the big one, right? The main reason to replace your seal is to stop water from escaping your shower. Over time, seals get worn down, cracked, or just plain nasty. This leads to leaks, which can cause all sorts of problems. Think about it: water damage to your floors, walls, and even the ceiling below. Nobody wants that! A new seal creates a tight barrier, keeping the water where it belongs – inside the shower. If you're seeing water pooling on your bathroom floor after every shower, it's definitely time for a replacement.
Improving Bathroom Aesthetics
Okay, let's be honest, old shower door seals aren't exactly pretty. They can get discolored, moldy, and just generally gross-looking. A new seal, on the other hand, can instantly freshen up the look of your shower and your entire bathroom. It's a small detail, but it can make a big difference in the overall feel of the space. Think of it as a mini-makeover for your shower. A clean, clear seal just looks so much better than a grimy, old one. Plus, it shows you care about the details, which always impresses guests. You can find a variety of shower door seals to match your bathroom's style.
Extending Shower Door Lifespan
This might not be the first thing that comes to mind, but replacing your shower door seal can actually help your shower door last longer. When water leaks out, it can damage the door itself, especially if it's made of wood or has metal components that can rust. By preventing leaks, you're protecting your door from water damage and helping it last for years to come. It's like giving your shower door a little extra insurance policy. Plus, think of all the money you'll save by not having to replace the entire door! Regular maintenance, including seal replacement, is key to shower door longevity.
Replacing your shower door seal is a simple and affordable way to prevent water damage, improve the look of your bathroom, and extend the life of your shower door. Don't wait until the leaks become a major problem – take care of it now and enjoy a cleaner, drier, and more beautiful bathroom.
Common Mistakes to Avoid When Choosing a Shower Door Seal

Ignoring Glass Thickness
One of the biggest mistakes people make is not paying attention to the glass thickness. Shower door seals come in various sizes to accommodate different glass thicknesses, and using the wrong size will lead to a poor fit and, ultimately, leaks. I remember when my neighbor, Sarah, tried to replace her shower door seal. She just grabbed one that looked about right from the hardware store, slapped it on, and was shocked when water was still spraying everywhere. Turns out, she completely overlooked the glass thickness. Don't be like Sarah!
Choosing the Wrong Seal Type
There are many types of shower door seals out there: straight seals, rounded seals, magnetic seals, bottom sweeps, side seals, door jamb seals, hinged side seals... the list goes on! Choosing the wrong one for your shower door configuration is a recipe for disaster. It's like trying to fit a square peg in a round hole. You need to consider:
- The shape of your door (straight or curved).
- The location where the seal will be installed (bottom, side, or top).
- Whether you need a magnetic seal for a complete closure.
I once spent an entire afternoon trying to install a straight seal on a curved shower door. It was a comedy of errors, involving lots of frustration and a few choice words. Save yourself the headache and make sure you get the right type of seal for your door.
Neglecting Proper Measurements
Accurate measurements are essential for a successful shower door seal installation. If you don't measure correctly, you'll end up with a seal that's either too long or too short, which means it won't do its job of preventing water leaks. Here's what can happen if you don't measure correctly:
- Seal is too short: Gaps will remain, leading to leaks.
- Seal is too long: It will interfere with the door's operation or look unsightly.
- Inaccurate angle cuts: The seal won't sit flush against the door or frame.
Wrapping It Up
Choosing the right shower door seal is more important than you might think. It keeps water in and prevents leaks, which can save you from bigger problems down the line. Remember to measure carefully and pick a seal that fits your shower type. Whether you go for a straight, rounded, or magnetic seal, make sure it’s durable and easy to install. If you follow the steps we laid out, you’ll have a seal that not only works well but also looks good. So, take your time, do it right, and enjoy a dry bathroom!
Frequently Asked Questions
What types of seals can I use for my shower door?
You can use different types of seals like bottom sweep seals, side seals, door jamb seals, or hinged side seals. Each one is made for specific areas of the shower door.
How can I tell if my shower door seal needs to be replaced?
Look for signs like water leaking out of the shower, visible wear on the seal, or gaps between the door and the frame.
Is it possible to cut the seal to fit my shower door?
Yes, you can cut the seal to the right size using scissors or a utility knife. Just make sure to measure carefully.
What materials are best for shower door seals?
Seals made from PVC or polycarbonate are good choices because they are strong and easy to clean.
How do I install a new shower door seal?
First, measure and cut the seal to size. Then, clean the area and press the seal into place, ensuring a tight fit.
What are the benefits of replacing my shower door seal?
Replacing your seal can prevent leaks, improve the look of your bathroom, and help your shower door last longer.