Essential Guide to Weatherstripping: Improve Your Home's Energy Efficiency
Weatherstripping is a simple yet effective way to boost your home's energy efficiency. It involves sealing gaps around doors and windows to prevent drafts and air leaks, which can lead to wasted energy and higher bills. In this guide, we'll walk you through the benefits of weatherstripping, the different types available, installation techniques, and maintenance tips to ensure your home stays cozy all year long.
Key Takeaways
- Weatherstripping helps reduce energy loss and keeps your home comfortable.
- There are various types of weatherstripping, including compression strips and foam options.
- Proper installation is key to maximizing the benefits of weatherstripping.
- Regular maintenance, like inspections and cleaning, can extend the life of your weatherstripping.
- Choosing the right material based on your climate and budget is essential for effective sealing.
Benefits of Weatherstripping
Weatherstripping is a simple upgrade that can really improve your home. It's not just about saving a few bucks; it's about making your living space more comfortable and efficient. Let's get into the specifics.
Energy Efficiency
Weatherstripping directly impacts your home's energy use. By sealing those sneaky gaps around doors and windows, you're preventing air leaks. This means your HVAC system doesn't have to work as hard to maintain a comfortable temperature. Less work for your system translates to less energy consumed, which is good for the environment and your wallet. Think of it as giving your HVAC system a break.
Comfort
Beyond the financial perks, weatherstripping makes a noticeable difference in how comfortable your home feels. No more cold drafts in the winter or struggling to cool rooms in the summer. Consistent temperatures throughout your home create a much more pleasant living environment. Plus, it helps keep out dust, pollen, and other allergens, improving your indoor air quality.
Energy Bill Savings
Weatherstripping, when combined with good home insulation, can lead to significant savings on your energy bills. Some sources say you could save up to 10% on your energy costs. That's money that can be used for other things, like a weekend getaway or a nice dinner out. It's a small investment that keeps on giving.
Weatherstripping is a straightforward way to cut down on energy waste and make your home a more enjoyable place to be. It's a win-win situation for your comfort and your bank account.
Types of Weatherstripping
Okay, so you're ready to dive into weatherstripping, but did you know there are actually different types? It's not just one-size-fits-all. Picking the right kind can make a huge difference in how effective it is. Let's break down some common options.
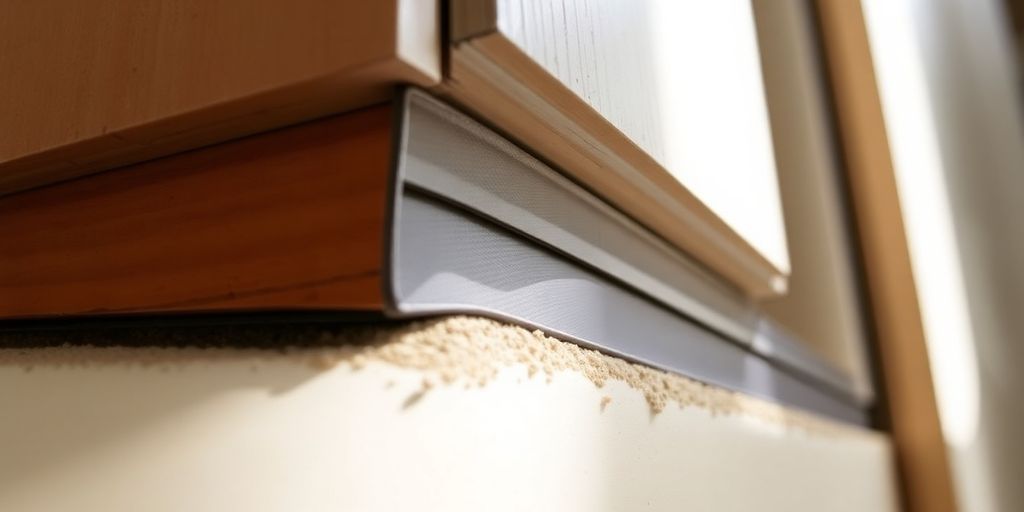
Compression Strips
Compression strips are designed to, well, compress when a door or window closes against them. This creates a tight seal that blocks air leaks. They're often made of materials like foam, rubber, or vinyl. The cool thing about compression strips is that they're pretty versatile and can be used in a bunch of different spots, like door jambs and window sashes. You can find them in different shapes and sizes, so you can usually find one that fits your specific needs. They are generally easy to install, often with an adhesive backing, but some might require nails or staples.
V-Strips
V-strips, sometimes called tension seals, are made from durable plastic or metal shaped like a "V". The idea is that the two sides of the "V" spring open to fill gaps. These are great because they're long-lasting and can handle a lot of wear and tear. They're especially good for sealing the sides of double-hung windows and doors. Installation usually involves sliding the V-strip into the gap, and the tension keeps it in place. They're a bit more involved to install than foam tape, but the payoff is a better, longer-lasting seal.
Foam Weatherstripping
Foam weatherstripping is probably the easiest and cheapest option out there. It comes in rolls or strips, often with an adhesive backing. You just peel and stick it where you need it. It's good for filling irregular gaps because it's so flexible. However, foam isn't the most durable material. It can compress over time and lose its effectiveness, especially in high-traffic areas. So, while it's a quick fix, you might need to replace it more often. It's ideal for window sashes and door frames where there isn't a ton of friction.
Choosing the right weatherstripping isn't just about picking a material; it's about understanding where you need it, how much wear and tear it will face, and how long you want it to last. A little research can save you time and money in the long run.
Installation Techniques for Weatherstripping
Okay, so you've got your weatherstripping material picked out and you're ready to get started. Here's the deal: proper installation is key to actually seeing those energy savings. Mess it up, and you might as well have thrown your money out the window (pun intended!).
Preparing the Surface
First things first: clean, clean, clean! You can't just slap weatherstripping onto a dirty surface and expect it to stick. Make sure the area is free of old adhesive, dirt, dust, and any other gunk. I usually use a scraper to get off the big stuff, then follow up with some rubbing alcohol for a really clean surface. Let it dry completely before you even think about moving on. Seriously, don't skip this step. It's like painting – the prep work is half the battle. This is also a good time to inspect for any damage to the door or window frame that might need addressing before you seal it up. You might need to do some filling or sanding to create a smooth surface for the weatherstripping installation.
Measuring and Cutting
Measure twice, cut once. You've heard it before, but it's especially true here. Get your measuring tape out and carefully measure the length of the door or window frame where you'll be applying the weatherstripping. Add a little extra – you can always trim it down, but you can't add it back! When cutting, use a sharp utility knife or scissors for a clean edge. A dull blade will just tear the material and make it look like a mess. I like to use a metal ruler as a guide when cutting straight lines. It helps keep things neat and tidy. Remember, a snug fit is what you're after, so take your time and get it right. It's also a good idea to test fit the cut weatherstripping before removing any adhesive backing.
Applying Weatherstripping
Now for the fun part! If you're using adhesive-backed weatherstripping, peel off the backing a little at a time and press it firmly into place. Start at one end and work your way down, making sure to maintain a consistent seal. For nail-in types, use small finishing nails and a hammer to secure the weatherstripping every few inches. Don't hammer too hard, or you'll damage the material. If you're using a compression strip, make sure it's properly aligned so that it creates a tight seal when the door or window is closed. After you've applied the weatherstripping, open and close the door or window a few times to make sure it's operating smoothly. If you feel any resistance or see any gaps, make adjustments as needed. You might need to add a shim or trim some of the material to get the perfect fit.
One thing I've learned over the years is that patience is key. Don't rush the installation process. Take your time, pay attention to detail, and you'll end up with a much better result. Plus, you'll save yourself the headache of having to redo it later.
Here's a quick guide to common weatherstripping types and their application:
| Type of Weatherstripping | Application Method | Notes |
|---|---|---|
| Adhesive-backed foam | Peel and stick | Easy to install, good for small gaps |
| V-strip | Slide into grooves | Durable, good for larger gaps |
| Compression strip | Nail or screw in | Creates a tight seal, requires precise alignment |
Maintenance Tips for Weatherstripping
Weatherstripping is not a 'set it and forget it' kind of thing. To keep it working well and lasting long, you need to give it some attention. Think of it like changing the oil in your car – a little effort goes a long way. Neglecting it means you'll be dealing with drafts and higher energy bills sooner than you'd like.
Regular Inspections
I try to check my weatherstripping at least twice a year – once in the spring and again in the fall. Look for cracks, tears, or places where it's coming loose. Pay special attention to areas that get a lot of sun or weather exposure. It's also a good idea to check after any major storms. I usually just walk around the house, open and close each door and window, and give the weatherstripping a good once-over. It's a quick task that can save you a lot of hassle down the road. Don't forget to check the door hinges too, as they can affect how well the weatherstripping seals.
Cleaning Techniques
Dirt and grime can build up on weatherstripping, especially around doors. This can make it less effective and even cause it to deteriorate faster. I usually just wipe it down with a damp cloth and some mild soap. Avoid using harsh chemicals or abrasive cleaners, as these can damage the material. For stubborn dirt, a soft brush can help. Make sure to dry the weatherstripping thoroughly after cleaning to prevent mold or mildew growth. I try to clean mine every few months, or whenever I notice it getting dirty. Here's a simple cleaning schedule I follow:
- Monthly: Wipe down weatherstripping around frequently used doors.
- Quarterly: Clean all weatherstripping with mild soap and water.
- Annually: Inspect and clean window tracks and door thresholds.
Replacing Worn Weatherstripping
Even with regular maintenance, weatherstripping will eventually wear out. When you start to notice drafts, or if the material is cracked, brittle, or no longer sealing properly, it's time to replace it. Don't wait until it's falling apart – replacing it sooner rather than later will save you money on your energy bills. Replacing weatherstripping tape is a pretty easy DIY project, but if you're not comfortable doing it yourself, you can always hire a professional.
Replacing worn weatherstripping is a key part of home maintenance. It helps maintain energy efficiency and prevents drafts, ensuring a comfortable living environment. Timely replacement saves money on energy bills and prevents further damage to doors and windows.
Selecting the Right Weatherstripping Material

Choosing the right weatherstripping can feel like a chore, but it's important. You want something that will last and actually do the job, right? It's not just about slapping any old thing on your doors and windows. Let's break down what you should be thinking about.
Consider Your Climate
Your local weather is a big deal. If you live where it gets super hot or freezing cold, you need weatherstripping that can handle it. Think about materials that won't crack or fall apart when the temperature goes crazy. For milder weather, you might be able to get away with something less heavy-duty, but still consider durability. For example, in areas with high humidity, you might want to consider rubber weatherstripping that resists moisture and prevents mold growth.
Evaluate Door and Window Types
What your doors and windows are made of matters too! Wood, metal, vinyl – they all react differently. Wood expands and contracts, so you need something flexible. Metal and vinyl are more stable, but you still need a good seal. Also, think about the design. Standard size? Weird gaps? You might need to get creative. The design of your door frame will also influence the type of weather stripping you need. For instance, a door with a wide gap might require a thicker weather stripping material.
Budget Considerations
Weatherstripping comes in all price ranges. Felt is cheap, but it doesn't last long. V-strips and tubular rubber are more expensive, but they're more durable. Think about how long you want it to last and how much you're willing to spend. It's a balance between cost and effectiveness. Don't just go for the cheapest option if it means you'll have to replace it every year.
Consider the long-term savings on your energy bill. Sometimes, spending a little more upfront for better weatherstripping can save you money in the long run. It's an investment in your home's energy efficiency, not just a quick fix.
Seasonal Weatherstripping Considerations
Weatherstripping isn't a set-it-and-forget-it kind of thing. You really need to think about how the changing seasons affect your home and adjust accordingly. It's all about being proactive to keep your house comfy and energy-efficient all year round. I've found that a little seasonal check-up can save a lot on energy bills.
Winter Preparations
Winter is when drafts become super obvious, and your heating bill skyrockets. Here's what I usually do to get ready:
- Add extra insulation to north-facing doors and windows. These areas get hit hardest by the cold winds.
- Install storm doors and windows for additional protection. They create an extra barrier against the cold.
- Replace any worn weatherstripping before cold weather sets in. Old, cracked strips are basically useless.
- Use temporary weatherstripping solutions for rarely used entrances. Think of that back door you only use for taking out the trash.
Summer Adjustments
Summer's all about keeping the cool air inside and the hot air outside. Weatherstripping plays a big role here too.
- Check for any weatherstripping damaged by winter conditions. The freeze-thaw cycle can be brutal.
- Clean and inspect window tracks and door thresholds. Grime can prevent a good seal.
- Consider removable weatherstripping for windows you plan to open frequently. That way, you're not wearing out the permanent stuff.
- Ensure attic hatches and AC unit openings are properly sealed. Leaky attics are energy vampires.
Year-Round Maintenance
Some things you just gotta do regularly, no matter the season. I try to stick to this routine:
- Inspect weatherstripping at least twice a year (spring and fall). Look for cracks, gaps, or wear.
- Clean weatherstripping with a mild soap and water solution. Avoid harsh chemicals that can damage the material.
- Replace damaged weatherstripping ASAP. Don't wait for it to get worse.
- Check for drafts around doors and windows using the candle or incense stick trick. It's surprisingly effective.
Weatherstripping is a small investment that pays off big time. By taking a seasonal approach, you can maximize its effectiveness and keep your home comfortable and energy-efficient year-round. Plus, you'll save money on your energy bills, which is always a win.
Maximizing Energy Efficiency with Weatherstripping

Weatherstripping is great, but it's even better when you combine it with other energy-saving strategies. Think of it as part of a bigger plan to make your home super energy efficient. It's not just about slapping some foam around your doors; it's about creating a whole-house system that works together.
Combining with Insulation
Weatherstripping and insulation are like peanut butter and jelly – they're good on their own, but amazing together. Insulation keeps heat from flowing through your walls and ceilings, while weatherstripping stops drafts from sneaking in around doors and windows. If you've got good insulation but leaky windows, you're still losing energy. Similarly, if your windows are sealed tight but your walls are poorly insulated, you're not getting the full benefit. Make sure you've got both covered. You can even insulate around the door frame for extra protection.
Using Energy Star Products
When you're buying weatherstripping, look for the Energy Star label. These products have been tested and certified to meet certain energy-efficiency standards. They might cost a little more upfront, but they'll save you money in the long run by reducing your energy bills. Plus, you know you're getting a product that actually works. Choosing Energy Star certified products is a smart move.
Sealing Other Areas of the Home
Don't just focus on doors and windows! Air can leak in through all sorts of cracks and gaps in your home. Check for openings around:
- Pipes and wiring that enter your house
- Electrical outlets and switch plates
- Attic hatches
- Basement windows
Use caulk or expanding foam to seal these gaps. It's a small investment that can make a big difference in your home's energy efficiency. Also, consider using door sweeps to block drafts.
Think of your house as a leaky bucket. Weatherstripping is like patching the big holes, but you also need to plug the small ones to really stop the leaks. Sealing all those little cracks and gaps can add up to significant energy savings over time. It's all about being thorough and paying attention to detail.
Wrapping It Up
In conclusion, weatherstripping is a simple yet effective way to boost your home's energy efficiency. It’s not just about saving money on your energy bills, but also about making your living space more comfortable. With so many types available and an easy installation process, there’s really no reason to skip this step. Just remember to check the condition of your weatherstripping regularly and replace it when needed. A little bit of effort can lead to a big difference in how cozy your home feels throughout the year.
Frequently Asked Questions
What is weatherstripping?
Weatherstripping is a material used to seal gaps around doors and windows. It helps keep air, water, and pests from getting inside, making your home more comfortable.
How does weatherstripping improve energy efficiency?
By sealing gaps, weatherstripping prevents warm air from escaping in winter and cool air from escaping in summer. This means your heating and cooling systems don't have to work as hard, saving energy.
What are the different types of weatherstripping?
There are several types, including compression strips, V-strips, and foam weatherstripping. Each type is suited for different needs and areas of your home.
How do I install weatherstripping?
To install weatherstripping, first clean the surface, measure the area, cut the weatherstripping to size, and then apply it firmly to seal any gaps.
How often should I check my weatherstripping?
It's a good idea to inspect your weatherstripping regularly, especially before winter and summer. Look for signs of wear and replace it if it's damaged.
Can weatherstripping help reduce noise?
Yes, weatherstripping can help block outside noise by sealing gaps around doors and windows, making your home quieter and more peaceful.