Essential Guide to Window Crank Handle Repair: Tips and Tricks for a Smooth Functioning Window
Windows are vital for letting in light and air, but a broken window crank can make them frustrating to use. This guide will help you understand common issues with window cranks, show you how to fix them, and when to consider replacing them. Whether you're a DIY enthusiast or just looking for some tips, we've got you covered!
Key Takeaways
- Identify issues like slipping, difficulty turning, or breakage in window cranks.
- Learn simple DIY fixes such as tightening screws and realigning gears.
- Know when it's time to replace your crank instead of repairing it.
- Follow a step-by-step guide for replacing your window crank handle.
- Gather essential tools and materials for a successful repair.
Identifying Common Window Crank Handle Issues
When it comes to window crank handles, there are a few common problems that can arise. Recognizing these issues early can save you time and effort. Here are the main types of problems you might encounter:
Slipping Crank
A slipping crank is when the handle turns easily but doesn’t fully open or close the window. This often happens due to:
- Loose screws
- Misaligned gears
- Worn-out parts
Difficult Turning
If you find it hard to turn the crank, it could be due to:
- Worn gears
- A binding mechanism
- Rust buildup
Complete Breakage
In the worst-case scenario, the crank handle might break completely. This can render the window unusable. If you notice any cracks or breaks, it’s time to consider a replacement.
Identifying these issues early can help you decide whether to repair or replace your window crank handle.
For example, the wrs white operator handle features a 3/8" spline for smooth window operation. This handle is made from durable materials and is priced at $9.99, making it a great option for various window styles. However, it is not compatible with truth hardware, so be sure to check compatibility before purchasing.
DIY Solutions for Window Crank Handle Repair
When it comes to fixing window crank handles, many issues can be tackled with some basic DIY skills. Here are some effective solutions:
Safety First
Before starting any repair, make sure to prioritize safety. Gather your tools, which typically include a screwdriver set and pliers. Always wear gloves to protect your hands, and work on a stable surface to avoid accidents.
Finding the Broken Source
- Remove the window treatment to access the crank mechanism.
- Look for visible signs of damage, such as:
- Cracks
- Broken gears
- Excessive rust
- Identify whether the problem is a loose screw or something more complex.
Tightening Loose Screws
Sometimes, the issue is as simple as a loose screw. Here’s how to fix it:
- Inspect the crank mechanism for any mounting screws.
- Gently tighten them using a screwdriver, but be careful not to over-tighten, as this can cause further damage.
Realigning Gears
If the crank is difficult to turn, the gears may be misaligned. Here’s a brief guide:
- Access the gears by removing a cover plate if necessary.
- Look for any gears that are out of place.
- Carefully adjust the gears by hand or with pliers. If unsure, consider replacing the crank instead.
Note: While these DIY methods can solve many common problems, extensive damage may require professional help or a complete replacement.
For those looking to replace their crank, consider options like the 1-3/8" white bronze project out handle, which is designed for easy operation and priced at $14.20. This handle is suitable for casement windows and offers various features to enhance functionality.
When to Replace Your Window Crank Handle
Limitations of Repair
Sometimes, fixing a window crank handle just isn’t enough. If the damage is too severe, it might be time to consider a replacement. Here are some signs that indicate you should replace your crank handle:
- Extensive Damage: If the gears are stripped or the handle is broken, repairs may not work.
- Old Age: Older window cranks may not function well anymore, even after repairs.
- Frequent Issues: If you find yourself fixing the crank often, it might be more cost-effective to replace it.
Identifying the Right Replacement
When you decide to replace your window crank handle, it’s crucial to find the right one. Here’s how:
- Check for Model Numbers: Look for any identifying marks on the crank or window frame.
- Consult the Manufacturer: Visit the manufacturer’s website for specific replacement parts.
- Consider a Universal Crank: If you can’t find the exact model, a universal crank can be a good alternative, though it may not fit perfectly.
Using a Universal Crank
A universal crank can be a lifesaver if you’re in a pinch. However, keep in mind:
- It may not match the original design.
- Ensure it fits securely to avoid future issues.
- Check compatibility with your window type.
Remember: Replacing a crank handle can be a straightforward task, but if you’re unsure, it’s best to consult a professional.
In summary, knowing when to replace your window crank handle can save you time and frustration. If you notice any of the signs mentioned, consider making the switch to a new handle, like the wrs roto x-drive operator handle - white, which is both stylish and durable for smooth window operation.
Step-by-Step Guide to Replacing a Window Crank Handle
Removing the Old Crank
To start the replacement process, you need to detach the old crank handle. This usually involves unscrewing it from the crank mechanism. Keep the screws in a safe spot for later use.
- Detach the Crank Handle: Unscrew the handle from the mechanism.
- Remove the Wood Sill Cover: Use a flathead screwdriver to gently pry off the cover. Be careful not to break it.
- Extract the Crank Mechanism: Pull out the crank mechanism from the window frame. This may take some effort if it’s old or rusty.
Aligning the New Crank
Once the old crank is out, it’s time to install the new one. Proper alignment is key for smooth operation.
- Ensure the new crank mechanism fits snugly in the window frame.
- Use the screws provided to secure the housing and spring.
- Double-check that everything is aligned correctly.
Securing the New Crank
After aligning, attach the crank handle to the new mechanism. Tighten the screws, but don’t overdo it to avoid damage. The handle should turn easily without any resistance.
Testing the Installation
Finally, test the new crank by opening and closing the window several times. Make sure it operates smoothly and stays in place. If you notice any issues, consult the troubleshooting section for help.
Always ensure you have all necessary tools and materials before starting your project. This will save you time and frustration later on.
Summary
Replacing a window crank handle can seem daunting, but by following these steps, you can achieve a smooth functioning window. Remember to take your time and ensure everything is aligned and secured properly. If you encounter any problems, don’t hesitate to seek help or consult additional resources.
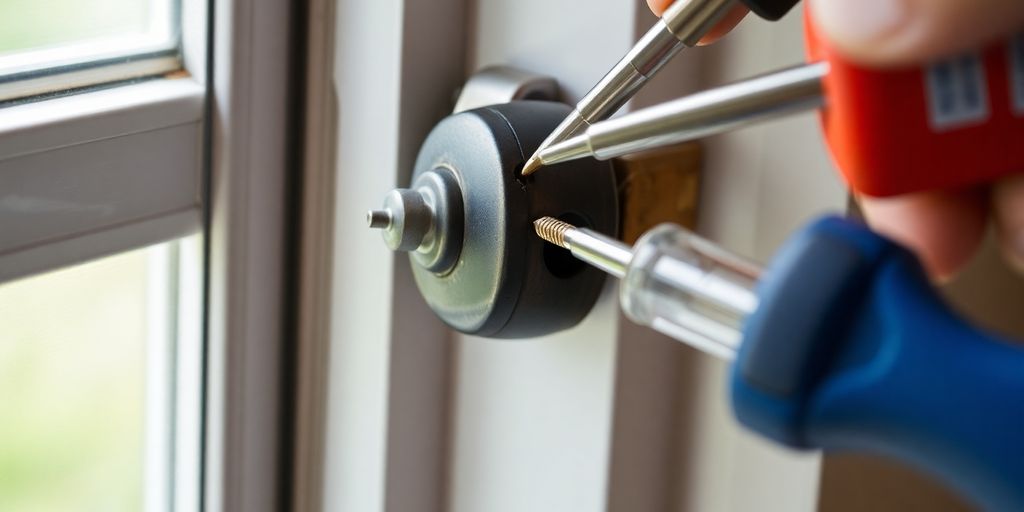
Tools and Materials Needed for Window Crank Handle Repair

Essential Tools
To successfully repair your window crank handle, you will need a few basic tools:
- Phillips head screwdriver: Essential for removing and securing screws.
- Flathead screwdriver: Useful for prying off covers and panels.
- Pliers: Great for gripping and turning parts.
- Drill (optional): Can speed up the process but is not necessary.
Recommended Materials
Make sure you have the following materials ready:
- New window crank: Ensure it matches your existing model.
- Replacement screws: Depending on your window type, you may need different screws:
- For wood windows: #10 x 1.0 Phillips flat head sheet metal screws.
- For PVC and metal windows: #10 Phillips flat head screws.
Safety Equipment
Safety is a priority during repairs. Always wear:
- Safety glasses: To protect your eyes from dust and debris.
- Gloves: To shield your hands from sharp edges.
- Ear protection: If using a drill, this is a good idea to protect your hearing.
Always double-check that you have all the necessary tools and materials before starting your project. This will save you time and frustration later on.
Highlighted Product
Consider the wrs white operator handle - 3/8" spline for a reliable replacement. It features a durable design and a clean white finish, priced at €9,95, ensuring a secure fit and smooth functionality.
Troubleshooting Common Window Crank Handle Problems

Difficulty in Removing Old Cranks
Removing old cranks can be a challenge. Here are some tips to make it easier:
- Use the right tools: A screwdriver and pliers are essential.
- Apply lubricant: If the crank is stuck, a little lubricant can help.
- Tap gently: Sometimes, a light tap with a rubber mallet can loosen it.
Ensuring Proper Fit of New Cranks
When installing new cranks, it’s important to check their fit. Follow these steps:
- Measure the old crank: Compare it with the new one to ensure compatibility.
- Adjust the frame if needed: If the new crank doesn’t fit, slight adjustments to the window frame may be necessary.
- Check for stability: Make sure the new crank is secure and operates smoothly.
Addressing Operational Problems
If your window crank isn’t working right, consider these common issues:
- Slipping Crank: If the crank turns but doesn’t open the window, it may have loose screws or misaligned gears.
- Difficult Turning: Excessive force needed to turn the crank could indicate worn gears or rust.
- Complete Breakage: If the handle is broken, it’s time to replace it. Look for options like the 1-3/8" white bronze project out handle for a suitable replacement.
Remember: Regular maintenance can prevent many of these issues. Keep your window cranks clean and lubricated for best performance.
Cost Considerations for Window Crank Handle Repair and Replacement
Cost of Replacement Parts
When it comes to replacing a window crank, the cost can vary widely. Here’s a quick breakdown:
| Type of Crank | Price Range |
|---|---|
| Basic Plastic Crank | $10 - $20 |
| Metal Crank | $20 - $50 |
| Specialty Crank | $30 - $100 |
Keep in mind that the price of the crank itself is just one part of the total cost.
Professional Installation Costs
If you decide to hire someone to do the installation, here are some typical costs:
- Labor Costs: Expect to pay between $50 and $150 for professional help, depending on your location and the complexity of the job.
- Additional Fees: Some professionals may charge extra for travel or special tools.
DIY vs Professional Repair
Deciding whether to tackle the repair yourself or hire a pro can depend on several factors:
- Skill Level: If you’re comfortable with tools and repairs, DIY can save you money.
- Time: Consider how much time you can dedicate to the repair. A professional can often complete the job faster.
- Extent of Damage: If the damage is extensive, it might be best to consult a professional.
Remember, while DIY repairs can be cost-effective, not all repairs are suitable for beginners. If you’re unsure, it’s wise to seek professional help to avoid further damage.
Final Thoughts on Window Crank Handle Repair
Fixing a window crank handle may seem tough at first, but with the right steps, you can do it easily. This guide has shown you how to spot problems, make repairs, or even replace the crank if needed. Remember to take your time and pay attention to details. If you get stuck, don’t hesitate to ask for help or look for more information online. With a little effort, your windows can work like new again, letting in fresh air and light while keeping your home comfortable.
Frequently Asked Questions
What are common issues with window crank handles?
Common problems include slipping cranks, difficulty in turning, and complete breakage.
How can I fix a window crank handle myself?
You can try tightening loose screws, realigning gears, or checking for any visible damage.
When should I replace my window crank handle?
Consider replacement if the damage is severe, or if repairs don't work.
What tools do I need for window crank handle repair?
You'll need screwdrivers, pliers, and safety gear like gloves and goggles.
How much does it cost to replace a window crank handle?
Replacement costs can range from $10 to $50 for parts, plus $50 to $150 for professional installation.
Where can I buy replacement window crank handles?
You can find them at home improvement stores, online retailers, or authorized dealers.