Essential Guide to Repairing a Door Hole: Tips and Tricks for Homeowners
If you've ever found a hole in your door, you know it can be a real headache. Whether it's from a doorknob bumping against it or just wear and tear over the years, fixing a door hole doesn't have to be complicated. With the right tools and a bit of know-how, you can tackle this repair yourself. This guide will walk you through everything you need to know, from understanding the damage to knowing when it's time to call in a pro.
Key Takeaways
- Identify common causes of door holes to prevent future damage.
- Gather essential tools and materials before starting repairs.
- Follow step-by-step techniques for effective door hole repair.
- Implement maintenance tips to keep your doors in good shape.
- Know when to hire a professional for complex door issues.
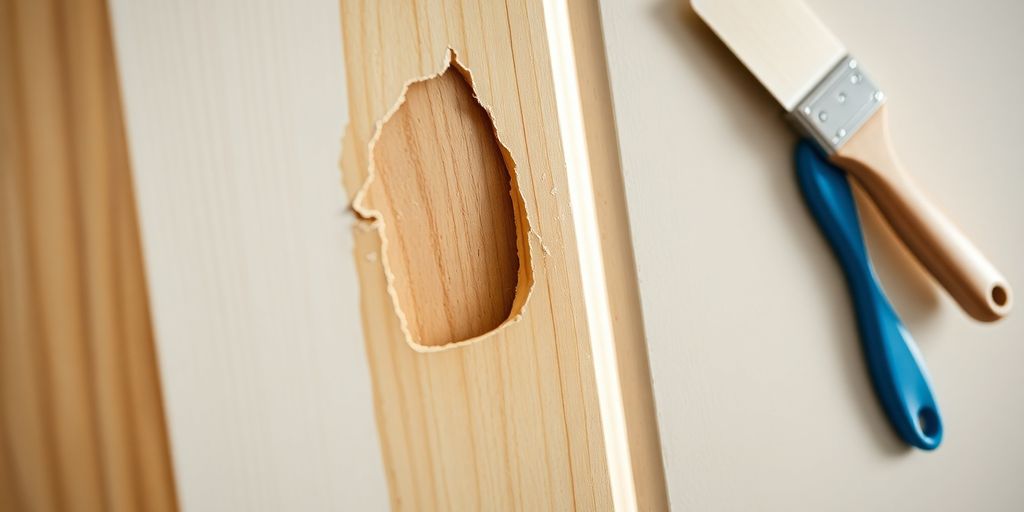
Understanding Door Hole Damage
Common Causes of Door Holes
So, how do door holes even happen? Well, it's usually a mix of things. Sometimes it's just plain old accidents – someone gets a little too enthusiastic moving furniture, or maybe a doorknob meets the wall with excessive force. Other times, it's the result of wear and tear over time. Think about it: doors get slammed, kicked (especially by frustrated teenagers, am I right?), and generally put through a lot. All that adds up. And let's not forget the occasional rogue pet. I swear, my neighbor's dog once tried to chew its way through their front door! Accidents, wear and tear, and even overzealous pets can all contribute to those unsightly holes.
- Impact from moving furniture
- Accidental collisions
- Forcible entry attempts
Signs Your Door Needs Repair
Okay, so you've got a door. How do you know if it needs repair, or if it's just got a little character? Obvious holes are a dead giveaway, of course. But sometimes, the damage is more subtle. Look for cracks around the doorknob or hinges. These can indicate that the door's structural integrity is compromised. Also, pay attention to how the door functions. Does it stick? Does it swing unevenly? Are there drafts coming through even when the door is closed? These can all be signs of underlying damage that needs attention. Ignoring these smaller issues can lead to bigger, more expensive problems down the road. Keep an eye out for door cracks.
Impact of Weather on Door Integrity
Weather can really mess with your doors. Think about it: wood expands and contracts with changes in temperature and humidity. This constant movement can weaken the door over time, making it more susceptible to damage. Rain and snow can seep into cracks and crevices, causing rot and decay. And strong winds can put extra stress on the door, especially if it's not properly secured. If you live in an area with extreme weather conditions, it's extra important to regularly inspect your doors for signs of damage. Weatherproofing your doors can help protect them from the elements and extend their lifespan. Consider these points:
- Expansion and contraction due to temperature changes
- Moisture damage leading to rot
- Increased stress from strong winds
Weather can be a real enemy to your doors. Regular maintenance and weatherproofing can help protect them from the elements and prevent costly repairs.
Essential Tools for Door Hole Repair
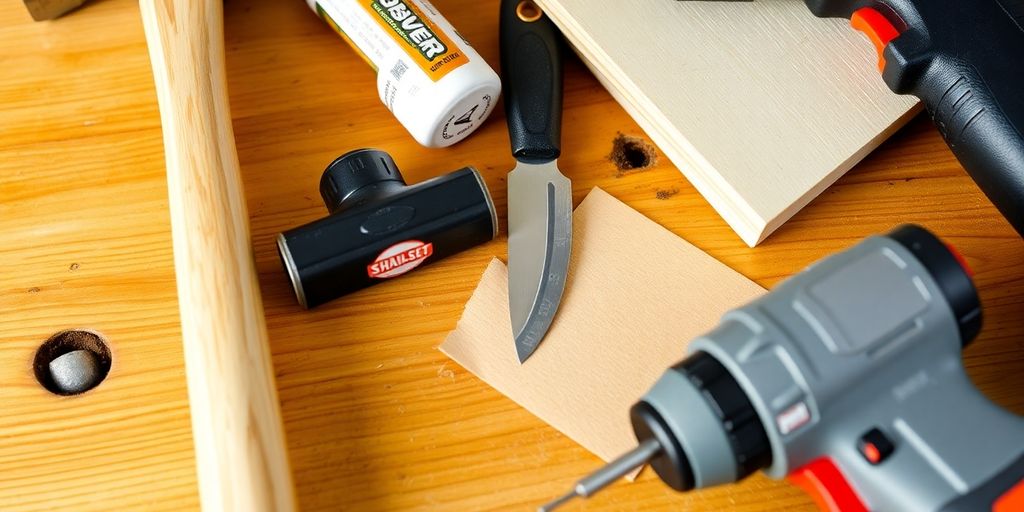
Basic Hand Tools You Need
Okay, so you're ready to tackle that door hole. First, you'll need some basics. A screwdriver set (both Phillips and flathead) is a must. You'll also want a utility knife for trimming and cleaning up edges. A good quality hammer can be useful, especially if you're dealing with any warped wood. Don't forget a tape measure to ensure accurate cuts and fits. A stud finder is also helpful to locate the frame.
Recommended Materials for Repairs
Now, let's talk materials. Wood filler is your best friend for smaller holes. For larger holes, you might need a drywall patch or even a new piece of drywall. Joint compound (or drywall mud) is essential for blending the patch seamlessly. You'll also need sandpaper in various grits (medium and fine) for smoothing things out. Wood glue is great for reinforcing any weak spots. And of course, paint that matches your door's color is the final touch. Here's a quick list:
- Wood filler
- Drywall patch
- Joint compound
- Sandpaper (various grits)
- Wood glue
Safety Gear for DIY Repairs
Safety first! Always wear safety goggles to protect your eyes from dust and debris. Gloves are also a good idea to keep your hands clean and safe from splinters. If you're sanding, a dust mask is a must to avoid inhaling particles. If you're using power tools, make sure you have hearing protection.
It's easy to overlook safety when you're focused on the repair, but taking a few extra precautions can prevent injuries and make the whole process much smoother. Trust me, a trip to the emergency room is way more expensive and time-consuming than a pair of safety glasses.
Step-by-Step Repair Techniques
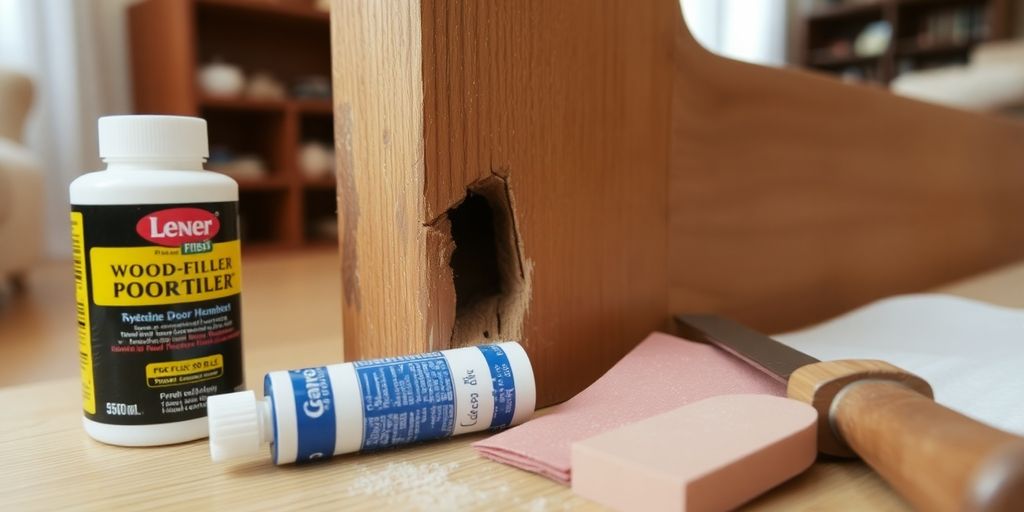
Preparing the Area for Repair
Alright, so you're ready to fix that hole. First things first, you gotta prep the area. This isn't just about slapping some filler in there and hoping for the best. We're talking about making sure the repair actually sticks and looks decent. Start by clearing away any loose bits of the door around the hole. Use a utility knife to carefully cut away any jagged edges. You want a clean, stable surface to work with. This step is crucial for a lasting repair. Next, grab some sandpaper – a medium grit works well – and lightly sand the area around the hole. This will help the filler adhere better. Wipe away any dust with a damp cloth and let it dry completely before moving on. A clean surface is a happy surface, and a happy surface means a better repair. Don't skip this step!
Applying Wood Filler Effectively
Okay, now for the fun part: applying the wood filler. Grab your tub of filler and a putty knife. Start by scooping out a small amount of filler onto the knife. Don't go overboard – you can always add more. Now, press the filler into the hole, making sure to fill it completely. Overfill it slightly, because the filler will shrink as it dries. Use the putty knife to smooth the surface of the filler, trying to match the contour of the door. It doesn't have to be perfect at this stage, but the smoother you get it now, the less sanding you'll have to do later. Let the filler dry completely according to the manufacturer's instructions. This could take a few hours, or even overnight, depending on the type of filler you're using. Patience is key here. Rushing it will only lead to cracks and a less durable repair. If the hole is particularly large, you might need to apply the filler in layers, letting each layer dry before applying the next. This prevents the filler from cracking as it dries. For minor door holes, this layering technique is especially helpful.
Sanding and Finishing Touches
Alright, the filler is dry, and now it's time to make it look like the hole never existed. Grab your sandpaper again, starting with a medium grit and then moving to a fine grit. Gently sand the filled area until it's flush with the surrounding door surface. Be careful not to sand too much, or you'll end up with a dip. Use a sanding block to keep the surface even. Once you're happy with the smoothness, wipe away any dust with a tack cloth. Now it's time for the finishing touches. If you want to paint the door, apply a primer first. This will help the paint adhere better and provide a more uniform finish. Let the primer dry completely, and then apply your paint. You might need two coats for full coverage. If you're staining the door, use a wood conditioner before applying the stain. This will help the stain absorb evenly. Let the stain dry, and then apply a clear coat to protect the finish. And there you have it – a door hole that's been repaired and looks as good as new! Remember, reinforcing door frames can prevent future damage.
Repairing a door hole isn't rocket science, but it does require a bit of patience and attention to detail. Don't rush the process, and take your time to do it right. With a little effort, you can save yourself a lot of money and keep your doors looking their best.
Preventing Future Door Hole Issues
Regular Maintenance Tips
Keeping your doors in good shape isn't just about fixing problems as they pop up; it's also about preventing them in the first place. Think of it like taking care of your car – a little routine maintenance can save you from big headaches down the road. Here are some things I've found helpful:
- Regularly inspect your doors and frames. Look for any signs of wear and tear, like small cracks, loose screws, or areas where the paint is chipping. Catching these early can prevent them from turning into bigger issues.
- Tighten loose screws. This is a simple one, but it can make a big difference. Loose screws can cause hinges to wobble and eventually lead to holes. A quick check with a screwdriver every few months can keep things secure.
- Clean your doors regularly. Dirt and grime can build up over time and damage the finish. A simple wipe-down with a damp cloth can keep them looking good and prevent deterioration.
I've learned that a little bit of prevention goes a long way. Spending a few minutes each month checking on my doors has saved me from having to do major repairs later on. It's all about staying proactive.
Choosing the Right Door Hardware
The hardware you choose for your doors can have a big impact on how well they hold up over time. Cheap hardware might save you money upfront, but it can end up costing you more in the long run if it breaks down or causes damage to your doors. Here's what I consider:
- Use high-quality hinges. Sturdy hinges can better support the weight of the door and prevent sagging, which can lead to holes around the hinge area.
- Choose the right type of screws. Longer screws can provide a more secure hold than shorter ones, especially for heavier doors. Make sure the screws are also made of a durable material that won't rust or corrode.
- Consider using reinforcement plates. These can add extra support to the door frame and prevent the wood from splitting or cracking around the hardware.
Weatherproofing Your Doors
Weather can really take a toll on your doors, especially exterior ones. Changes in temperature and humidity can cause the wood to expand and contract, which can lead to cracks and holes. Here's how I try to protect my doors from the elements:
- Apply weather stripping. This helps to seal gaps around the door and prevent drafts, which can also help to regulate the temperature and humidity inside your home. You can find weather stripping options at most hardware stores.
- Use a sealant or caulk. This can help to fill in any small cracks or gaps around the door frame and prevent water from seeping in.
- Consider painting or staining your doors. This can provide a protective barrier against the elements and help to prevent the wood from rotting or warping.
Here's a simple table to illustrate the impact of weatherproofing:
| Weatherproofing Measure | Benefit |
|---|---|
| Weather Stripping | Reduces drafts, regulates humidity |
| Sealant/Caulk | Prevents water damage, fills in gaps |
| Paint/Stain | Protects wood from rot and warping |
When to Seek Professional Help
Sometimes, that door hole repair goes beyond a simple DIY project. It's important to recognize when you're in over your head and need to call in the pros. I've been there, thinking I could fix anything, only to make it worse! Knowing your limits can save you time, money, and a whole lot of frustration.
Identifying Complex Door Problems
Some door issues are more than just a cosmetic fix. If you're dealing with any of these, it's time to consider professional help:
- Door Frame Damage: If the frame itself is warped, rotted, or significantly damaged, it affects the entire structure. This isn't just about filling a hole; it's about structural integrity. You might need door frame reinforcement.
- Repeated Failures: Tried fixing the same hole multiple times, and it keeps coming back? There's likely an underlying issue you're not addressing.
- Antique or Valuable Doors: Don't risk damaging a valuable door with a DIY attempt. Professionals have the experience to handle delicate materials and construction.
Understanding Safety Risks
Door repairs can sometimes involve safety hazards you might not think about. Here's when to prioritize safety and call a professional:
- Heavy Doors: Working with extremely heavy doors can be dangerous. Professionals have the equipment and manpower to handle them safely.
- Structural Concerns: If you're unsure about the door's or frame's structural integrity, don't take chances. A collapsing door can cause serious injury.
- Electrical Components: Smart doors or doors with electrical features require specialized knowledge. Don't attempt electrical repairs without proper training.
Attempting a DIY fix when you lack the necessary skills or experience can lead to further damage, personal injury, or even compromise the security of your home. It's always better to err on the side of caution.
Evaluating Cost vs. DIY
While DIY repairs can save money, sometimes the cost of materials, tools, and your time can outweigh the cost of hiring a professional. Consider these factors:
- Tool Investment: Do you need to buy specialized tools for the repair? The cost of these tools can quickly add up.
- Time Commitment: How much time will the repair take? Is your time worth more than the cost of hiring someone?
- Potential for Mistakes: If you make a mistake, you might end up paying more to fix it than if you had hired a professional in the first place. DIY repairs can be tricky.
Ultimately, the decision of whether to DIY or hire a professional depends on your skills, the complexity of the repair, and your comfort level. When in doubt, it's always best to consult with a professional to ensure the job is done safely and correctly.
Quick Fixes for Minor Door Holes
Sometimes you just need a quick fix, right? Maybe you don't have time for a full-blown repair, or the damage is just too small to warrant it. Here are a few things you can try when you're in a pinch. These are more like band-aids than permanent solutions, but they can definitely buy you some time.
Using the Toothpick Method
Okay, so the toothpick method is probably the easiest and cheapest way to deal with a stripped screw hole. I've used this a bunch of times, and it's surprisingly effective. Basically, you're just filling the hole with small pieces of wood so the screw has something to grip onto. Here's how it goes:
- Take out the screw that's loose.
- Grab a bunch of wooden toothpicks (or even matchsticks if that's all you've got). Dip the toothpicks in wood glue. This helps them stick and expand.
- Shove as many glue-covered toothpicks into the hole as you can. You might need to break them to fit.
- Let the glue dry completely. This is important! Give it at least a few hours.
- Trim off any excess toothpick sticking out of the hole with a knife or something similar.
- Put the screw back in. Don't overtighten it, or you'll just strip the hole again.
Applying Hinge Shims
Hinge shims are thin pieces of cardboard or plastic that you can slip behind the hinge to adjust its position. They're super handy if your door is sticking or not closing properly. You can buy them at any hardware store, and they come in different thicknesses. Here's the deal:
- Loosen the screws on the hinge that's causing the problem. Don't take them all the way out yet.
- Slide the hinge shim behind the hinge plate. You might need to experiment with different thicknesses to get it just right.
- Tighten the screws back up. If the screws are too short because of the shim, you might need to get longer ones.
- Open and close the door to see if it's fixed. If not, try adding another shim or adjusting the position of the existing one.
Temporary Solutions for Urgent Repairs
Sometimes you just need a fix that will hold you over until you can do a proper repair. Here are a couple of ideas:
- Use a longer screw: If the screw is just barely stripped, a longer screw might be able to reach some solid wood deeper in the hole.
- Wrap the screw with steel wool: Stuffing a little bit of steel wool into the hole before you put the screw in can give it some extra grip.
- Use masking tape: Wrapping the screw threads with masking tape can also help it grip better. It's not a long-term solution, but it can work in a pinch.
Remember, these are just temporary fixes. They're not going to last forever, and they might not even work at all if the damage is too severe. But if you're in a hurry and need something to hold you over, they're worth a try.
Long-Term Solutions for Door Holes
Reinforcing Door Frames
Okay, so you've patched that hole, but what about making sure it never happens again? Reinforcing your door frame is a solid move. A reinforced frame can withstand more force, preventing future damage. Think about it – a stronger frame means less stress on the door itself. You can add metal plates around the strike plate and hinge areas. This distributes the impact and makes it way harder to kick in or damage the door. Also, consider using longer, heavier-duty screws when securing the frame to the wall studs. This makes a huge difference. It's like giving your door frame a serious upgrade. If you are experiencing security measures, consider reinforcing your door frame.
Replacing Damaged Doors
Sometimes, patching just isn't enough. If your door has taken a serious beating, like, a really serious beating, replacement might be the only real option. I know, it sounds drastic, but think of it as a fresh start. A new door not only looks better but also provides better security and insulation. Plus, you can choose a door made from more durable materials. It's an investment, sure, but it's one that pays off in the long run. You can get doors that are solid core, which are way tougher than hollow-core doors.
Upgrading to Durable Materials
Speaking of durable materials, let's talk about your options. Not all doors are created equal. Hollow-core doors are cheap, but they're also super easy to damage. Solid-core doors are much better, but you could also go for a steel or fiberglass door. These are incredibly strong and resistant to damage.
Here's a quick rundown:
- Hollow-core: Cheapest, least durable, good for interior doors.
- Solid-core: More expensive, more durable, good for exterior doors.
- Steel/Fiberglass: Most expensive, most durable, best for security and weather resistance.
Choosing the right material can save you a lot of headaches down the road. Think about the location of the door and the level of security you need. A front door should be much stronger than a closet door, obviously. Don't skimp on quality when it comes to exterior doors. It's worth the extra money for the peace of mind.
Consider the door weight when upgrading to durable materials.
Wrapping It Up
So there you have it! Fixing a hole in your door doesn’t have to be a huge hassle. With just a few tools and some patience, you can tackle this project yourself. Whether you go for the quick toothpick trick or a more thorough approach with wood filler, you’ve got options. Just remember, if things get too tricky or if you’re dealing with a fancy door, it might be best to call in a pro. But for most homeowners, these tips should help you get your door back in shape without breaking the bank. Happy repairing!
Frequently Asked Questions
What are common reasons for holes in doors?
Holes in doors can happen due to accidents, like someone bumping into them, or from wear and tear over time.
How can I tell if my door needs repair?
If you see cracks, holes, or if the door doesn't close properly, it likely needs some repair.
What tools do I need to fix a door hole?
You will need basic tools like a screwdriver, wood filler, sandpaper, and possibly wood glue.
How can I prevent future door damage?
Regularly check your door for issues, use the right hardware, and consider weatherproofing.
When should I call a professional for door repairs?
If the door frame is damaged or if you’ve tried fixing it multiple times without success, it’s best to call a pro.
What are some quick fixes for small door holes?
You can use wooden toothpicks or matchsticks with glue to fill small holes quickly.