Essential Guide to Andersen Storm Door Parts for Easy Repairs
If you own an Andersen storm door, knowing how to fix it when things go wrong can save you time and money. This guide covers the essential parts you'll need for repairs, how to maintain your door, and tips for upgrades. Whether you're dealing with a simple handle replacement or looking to weatherproof your door, we've got you covered with everything you need to know about Andersen storm door parts.
Key Takeaways
- Familiarize yourself with common Andersen storm door parts for easier repairs.
- Quality components can significantly extend the life of your storm door.
- Make sure to identify your specific door model before purchasing parts.
- Regular maintenance can prevent costly repairs down the line.
- Upgrading your hardware can improve both security and energy efficiency.
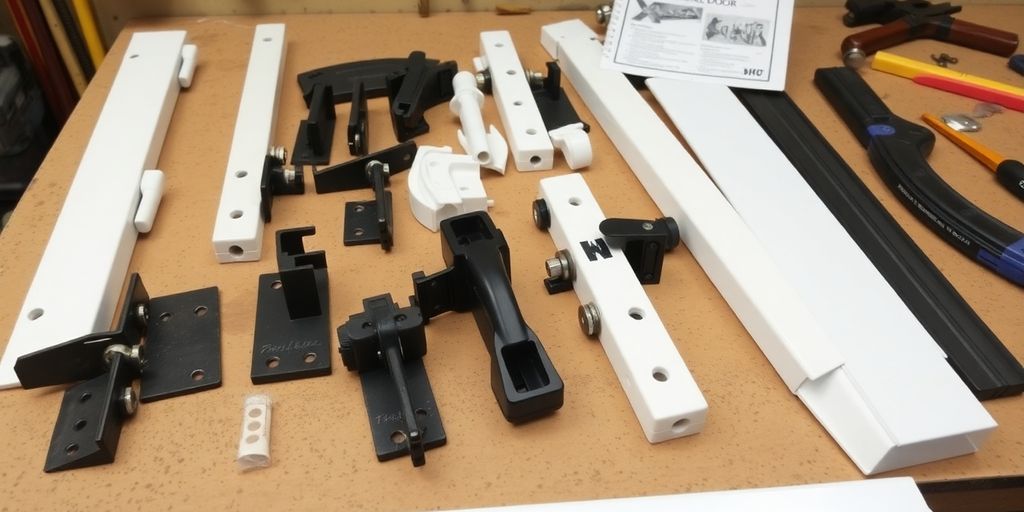
Understanding Andersen Storm Door Parts

Overview of Common Parts
Okay, so you're diving into the world of Andersen storm doors? First things first, let's get familiar with the basics. You've got your door panel, which is the main part that swings open and closed. Then there's the frame, which holds the door in place. Handles and lock sets are pretty self-explanatory, but there are different styles. Don't forget the closer, that springy thing that stops the door from slamming. And of course, the weather stripping, which keeps the drafts out. It's a lot, but you'll get the hang of it.
- Door Panel
- Frame
- Handle and Lock Sets
Importance of Quality Components
Listen, I get it. Saving a few bucks is always tempting. But when it comes to storm door parts, going cheap can really bite you later. Think about it: these doors take a beating from the weather, from constant use, and sometimes even from accidental bumps. If you use low-quality parts, they're just not going to hold up. You'll be replacing them sooner, which means more money and more hassle in the long run. Investing in good quality weather stripping is the way to go. Trust me on this one.
Identifying Your Door Model
Before you even think about ordering parts, you absolutely need to know your door model. Seriously, this is step one. Andersen makes a ton of different doors, and the parts aren't always interchangeable. The easiest way to find your model number is to look for a sticker or stamp on the door itself. Check the top, bottom, and sides of the frame. If you can't find it there, try looking through your original paperwork. Once you have that model number, write it down and keep it handy. It'll save you a lot of headaches when you're trying to find the right universal parts.
Finding the right model is like having the key to a treasure chest of perfectly fitting parts. Without it, you're just guessing, and that never ends well.
Essential Hardware for Andersen Storm Doors
Handles and Lock Sets
Okay, so you're thinking about the handle on your Andersen storm door. It's more than just something to grab; it's the first impression people get of your home, right? Plus, it's gotta work smoothly. You've got options, from the basic, functional ones to the fancier, more decorative styles. I saw a traditional handle that looked pretty nice.
- Consider the finish: Does it match your other hardware? Brushed nickel, brass, oil-rubbed bronze – they all give a different vibe.
- Think about how it feels in your hand. Is it comfortable to grip?
- Make sure it's compatible with your door's thickness. Some handles are made for thicker doors than others.
Lock sets are important too. You want something that's actually going to keep your home secure. Don't skimp on this!
Closer Brackets and Mechanisms
Ugh, the door slamming shut is the worst, isn't it? That's where the closer comes in. And the closer brackets? They're what keep the whole thing attached to your door and frame. If those brackets are busted, your closer is useless. I saw some closer brackets online for about $26.
- Check your brackets regularly for wear and tear. Are they loose? Rusted?
- Make sure you get the right type of bracket for your door model. Not all brackets are created equal.
- When installing, use the right screws. You don't want them stripping out or being too short.
A properly functioning closer not only prevents annoying slams but also helps to maintain the door's weather seal, keeping drafts and insects out. It's a small part that makes a big difference.
Key Cylinders and Security Features
Let's talk security. Your key cylinder is what stands between you and someone trying to get in. A cheap, flimsy cylinder? Not good. You want something that's going to hold up. I saw a Schlage key cylinder that looked pretty sturdy.
- Consider getting a high-security cylinder. They're harder to pick or bump.
- Make sure the cylinder is compatible with your lock set. You don't want to end up with something that doesn't fit.
- Think about getting your cylinders re-keyed if you move into a new place. You never know who might have the old keys.
Weatherproofing Your Andersen Storm Door
Types of Weather Stripping
Okay, so weather stripping. It's not the most glamorous part of owning a storm door, but trust me, it's super important. Think of it as the unsung hero keeping the drafts, bugs, and rain out. There are a few main types you'll run into when dealing with Andersen storm doors. First, you've got foam tape. This is usually the cheapest and easiest to install, but it also wears out the fastest. Then there's V-strip, which is a thin, flexible plastic that creates a seal when the door is closed. It's a bit more durable than foam. Finally, you have tubular rubber or silicone weather stripping, which is probably the best in terms of longevity and effectiveness. It's a little pricier, but it'll save you money in the long run by keeping your energy bills down. Make sure you get the right weather strip for your door model.
Installation Tips for Weather Stripping
Alright, so you've got your weather stripping. Now what? Installation is key. First, clean the surface where you're going to stick the stripping. Seriously, wipe it down with some rubbing alcohol. Any dirt or grime will prevent the adhesive from sticking properly. Next, measure and cut the stripping to the right length. It's better to be a little too long than too short. Peel off the backing and carefully apply the stripping, pressing firmly as you go. Pay special attention to the corners – that's where drafts love to sneak in. If you're using V-strip, make sure the V is facing the right way to create a good seal. And if you mess up? Don't sweat it. Just peel it off and try again. It happens to the best of us. Here's a quick rundown:
- Clean the door frame.
- Measure and cut the weather stripping.
- Apply carefully, pressing firmly.
Maintaining Weather Resistance
So, you've got your weather stripping installed, and everything's sealed up tight. Great! But don't just forget about it. Weather stripping needs a little love to keep doing its job. Check it regularly for cracks, tears, or peeling. If you see any damage, replace it ASAP. Also, give it a good cleaning every now and then. Just wipe it down with a damp cloth to remove any dirt or debris. And if you live in an area with harsh weather, consider applying a sealant to protect the stripping from the elements. A little maintenance goes a long way in prolonging the life of your weather stripping and keeping your home comfortable. Also, consider the closer brackets to keep the door aligned.
Properly maintained weather stripping can significantly reduce energy costs and improve the overall comfort of your home. Regular inspections and timely replacements are key to maximizing its effectiveness.
Repairing and Replacing Andersen Storm Door Parts
Common Repair Scenarios
Okay, so things break, right? With Andersen storm doors, you'll probably run into a few common issues. One of the big ones is a sagging storm door. This often happens because the hinges get loose or the door frame shifts a bit over time. Another frequent problem? The closer mechanism failing. Suddenly, your door is slamming shut, or it won't close all the way. Weather stripping also takes a beating, especially after a few harsh winters. Handles and lock sets can get sticky or just plain break, too. And don't forget about the screen – those pesky tears can let bugs in!
Step-by-Step Replacement Guide
Alright, let's say something is broken. Here's a general idea of how to replace it. Always start by identifying the exact part you need. Check your door's model number and look it up online or at a local dealer. Once you have the replacement part, here's what to do:
- Gather your tools: Screwdrivers, pliers, maybe a drill, and safety glasses are a must.
- Remove the old part: Carefully unscrew or detach the broken component. Pay attention to how it's connected so you can easily install the new one.
- Install the new part: Line up the new part and secure it in place. Make sure everything is aligned correctly before tightening screws.
- Test it out: Open and close the door a few times to make sure the new part is working smoothly.
Replacing weather stripping is usually pretty easy – just peel off the old stuff and stick on the new. But for more complicated repairs, like replacing a handle set or closer, you might want to watch a video or get a friend to help.
Tools Needed for Repairs
Having the right tools makes a huge difference. Here's a basic list:
- Screwdrivers: Both Phillips head and flathead in various sizes.
- Pliers: For gripping and pulling.
- Utility Knife: For cutting weather stripping or other materials.
- Drill/Driver: For removing stubborn screws or installing new ones.
- Tape Measure: To ensure accurate measurements.
- Safety Glasses: Always protect your eyes!
And sometimes, a little WD-40 can work wonders for sticky door parts.
Where to Find Andersen Storm Door Parts
So, your Andersen storm door needs a little TLC? Finding the right parts is key to getting it back in shape. Luckily, you've got a few options to explore. Let's break down where you can track down those essential components.
Authorized Dealers and Retailers
One of the best places to start your search is with authorized Andersen dealers. These guys know their stuff and can help you pinpoint the exact part you need. Plus, they often have access to parts that aren't available just anywhere. Big box stores like Home Depot or Lowe's also carry a selection of Andersen storm door parts, though their inventory might be more limited. Checking with local hardware stores is another good bet, especially if you need something quickly.
Online Shopping Options
Of course, the internet is a treasure trove of parts. The official Andersen website is a great place to start, offering a wide range of replacement parts. Sites like Amazon and eBay can also be useful, but be sure to double-check the seller's reputation and the part's compatibility before you buy. Don't forget to look at specialty online retailers that focus on door and window hardware; they might have exactly what you're looking for. You can often find universal parts online.
DIY Repair Kits
If you're tackling a common repair, like replacing weather stripping or a handle, a DIY repair kit might be the way to go. These kits usually include everything you need for a specific job, saving you the hassle of buying individual parts. They're available at many of the same places you'd find individual parts – authorized dealers, big box stores, and online retailers. Just make sure the kit is designed for your specific Andersen storm door model. You can find closer brackets in some kits.
Before you order anything, take the time to identify your door model. This will save you a lot of headaches and ensure you get the right fit. Check the door frame for a sticker or stamp with the model number. With that info in hand, you'll be well on your way to finding the perfect replacement part.
Maintaining Your Andersen Storm Door
Regular Maintenance Checklist
Okay, so you've got your Andersen storm door all fixed up – awesome! Now, let's keep it that way. Regular maintenance is key. Think of it like this: a little effort now saves you from big headaches (and expenses) later. Here's a simple checklist I try to follow:
- Inspect the weather stripping weather stripping every few months. Look for cracks, tears, or places where it's coming loose. If it's damaged, replace it ASAP. It's way cheaper than dealing with drafts and water leaks.
- Check the hardware – handles, locks, and closers. Make sure everything is tight and working smoothly. A little WD-40 can work wonders on squeaky hinges or sticky locks.
- Give the door a good cleaning a couple of times a year. Use a mild soap and water solution. Avoid harsh chemicals that could damage the finish.
- Lubricate the door closer mechanism. This will help it operate smoothly and prevent it from slamming shut.
Signs of Wear and Tear
Even with regular maintenance, things can still go wrong. Keep an eye out for these common signs of wear and tear:
- Drafts: If you feel cold air coming in around the edges of the door, your weather stripping is probably failing.
- Difficulty opening or closing: This could be a sign of misaligned hinges, a sticking lock, or a problem with the door closer.
- Rust or corrosion: This is more common in coastal areas, but it can happen anywhere. Clean it off as soon as you see it to prevent further damage. You might need to replace some parts if the rust is bad.
- Loose screws or hardware: Tighten them up before they cause bigger problems. Sometimes, you might need to replace the screws with slightly larger ones if the holes are stripped.
Tips for Prolonging Door Life
Want to get the most out of your Andersen storm door? Here are a few extra tips:
- Adjust the door closer as needed. If the door is slamming shut too hard, loosen the adjustment screw. If it's not closing all the way, tighten it.
- Protect the door from the elements. If you live in an area with harsh weather, consider installing an awning or overhang to shield the door from rain, snow, and sun.
- Don't overload the door with decorations. Heavy wreaths or other decorations can put extra stress on the hinges and frame.
- Consider a traditional handle upgrade. Newer handles are more durable and can add a fresh look to your door.
Taking care of your Andersen storm door doesn't have to be a chore. A little bit of attention can go a long way in keeping it looking and working great for years to come. Plus, it's way cheaper than replacing the whole thing!
Upgrading Your Andersen Storm Door

Modernizing Hardware
Okay, so you're thinking about giving your Andersen storm door a bit of a facelift? First things first, let's talk hardware. Swapping out the old handles and lock sets can make a surprisingly big difference. Think about it – that's what you touch every single day. A new handle, especially one with a different finish, can really change the whole look. For example, you could replace your current handle with a traditional handle in brass, nickel, or oil-rubbed bronze.
- Consider the style of your home. Does a sleek, modern handle fit better, or something more traditional?
- Don't forget about the finish. Matching the finish to your other exterior hardware (like your house numbers or porch lights) can create a cohesive look.
- Think about ease of use. Is the current handle easy to grip, especially in bad weather? A new handle could be more ergonomic.
Adding Decorative Elements
Beyond just the functional stuff, you can also add some decorative elements to your storm door. This is where you can really let your personal style shine. I'm not talking about anything crazy, just small touches that make a difference. You could add decorative trim around the edges of the glass, or even replace the glass panel with something textured or patterned.
- Consider adding a decorative kick plate to protect the bottom of the door from scuffs and scratches. Plus, they look nice!
- Think about adding some decorative hinges. It's a small detail, but it can make a big difference.
- You could even paint the door a different color. Just make sure it complements the rest of your home's exterior.
Enhancing Energy Efficiency
Upgrading your storm door isn't just about looks; it can also help with energy efficiency. One of the easiest ways to do this is by replacing the weather stripping. Over time, weather stripping can wear out and become less effective, letting drafts in and driving up your energy bills. Replacing it is a pretty simple DIY project, and it can make a noticeable difference. Also, consider the glass in your storm door. Some newer models come with low-E glass, which helps to reflect heat and keep your home cooler in the summer and warmer in the winter.
Upgrading your storm door is a great way to improve your home's curb appeal and energy efficiency. It doesn't have to be a huge project, and even small changes can make a big difference. So, take a look at your storm door and see what you can do to give it a little love.
Wrapping It Up
So, there you have it! Fixing up your Andersen storm door doesn’t have to be a headache. With the right parts and a little know-how, you can tackle those repairs like a pro. Whether it’s a new handle or some weather stripping, knowing what you need makes all the difference. Just remember, if you ever feel stuck, there are plenty of resources out there to help you out. Happy repairing!
Frequently Asked Questions
What are the main parts of an Andersen storm door?
The main parts include handles, locks, closer mechanisms, and weather stripping.
How do I identify my Andersen storm door model?
You can find the model number on a sticker usually located on the door frame or inside the door.
What tools do I need for repairing storm door parts?
Basic tools like a screwdriver, pliers, and a wrench are usually needed for most repairs.
Where can I buy replacement parts for Andersen storm doors?
You can buy parts from authorized dealers, local hardware stores, or online retailers.
How can I improve the weatherproofing of my storm door?
You can add or replace weather stripping and make sure all seals are tight to prevent drafts.
What should I do if my storm door won't close properly?
Check the closer mechanism and hinges for damage or misalignment, and adjust or replace them as needed.