Essential Tips for Mastering Window Glazing: A Step-by-Step Guide
Reglazing windows might sound like a daunting task, but it's a project you can tackle with a little patience and the right tools. Whether you're looking to fix up an old window or boost your home's energy efficiency, knowing how to reglaze can save you money and give your windows a fresh look. This guide will walk you through the basics of window glazing, the tools you'll need, and step-by-step instructions to get the job done right.
Key Takeaways
- Window reglazing helps maintain the efficiency and appearance of your windows.
- Gather all necessary tools and materials before starting the reglazing process.
- Take your time when removing old glazing to avoid damaging the glass.
- Apply new glazing compound carefully for a smooth finish.
- Regular maintenance is key to prolonging the life of your reglazed windows.
Understanding the Basics of Window Reglazing
What Is Window Reglazing?
Okay, so what's window reglazing all about? Basically, it's swapping out that old, hardened putty that keeps the glass in your window frame snug. Over time, that original glazing can get brittle and crack, which leads to drafts and makes your windows less efficient. Reglazing fixes that, bringing your windows back to life without having to replace the whole thing. It's a great skill to have if you're into fixing up older homes.
Benefits of Reglazing Windows
Why bother reglazing windows? Well, there are a few good reasons:
- Energy Efficiency: Properly sealed windows keep the inside temperature consistent, which can lower your heating and cooling bills. Think of it as energy savings for your wallet.
- Cost Savings: It's usually way cheaper to reglaze a window than to buy a whole new one. That's a win.
- Better Looks: Fresh glazing makes your windows look new again, boosting your home's curb appeal.
Common Mistakes to Avoid
Reglazing can be a bit tricky, especially if you're just starting out. Here are some common mistakes to watch out for:
- Skipping the Prep: If you don't get rid of all the old glazing, the new stuff won't seal properly.
- Wrong Tools: Using the right glazing tools is key for a clean finish. Don't skimp on this.
- Rushing: You need to give the glazing compound enough time to set. Patience is important here.
Taking your time with each step ensures a successful reglazing job. Don't rush it; patience here pays off in the long run.
Essential Tools and Materials for Reglazing

Must-Have Tools for Reglazing
Okay, so you're diving into window reglazing? Awesome! You're gonna need some stuff. First off, a good putty knife is non-negotiable. Get one that feels right in your hand; a stiff blade is usually better for scraping off the old, crusty glazing. You might also want a heat gun. Seriously, these things are amazing for softening up that stubborn, old glazing. Makes the whole removal process way easier. And, if you're planning on replacing any broken glass, don't forget a glass cutter. It's all about having the right tools to make the job smoother.
- Putty Knife (stiff blade)
- Heat Gun (for softening old glazing)
- Glass Cutter (if replacing glass)
Choosing the Right Glazing Compound
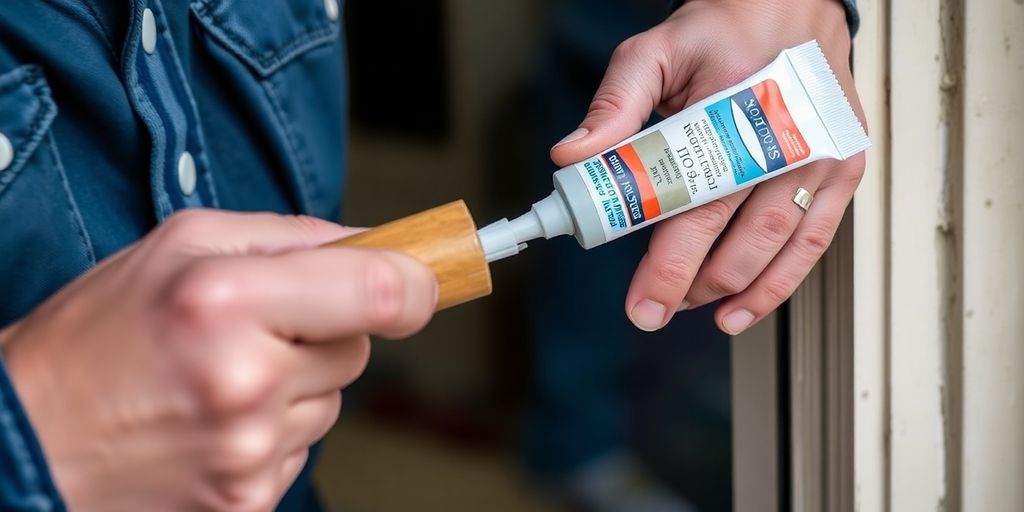
Picking the right glazing compound is super important. It's what holds everything together, literally. There are a bunch of different types out there, but a lot of DIYers swear by DAP 33 Glazing. It's pretty easy to find and work with. If you're looking for something a bit more heavy-duty, Sarco Type M Putty is a popular choice among the pros. It's known for being really durable and holding up well against the weather. No matter what you pick, make sure you knead it until it's soft and pliable before you start slathering it on. It makes a huge difference in how easy it is to apply. You can find a variety of window restoration experts online.
Safety Gear and Precautions
Alright, let's talk safety. This isn't the most dangerous job in the world, but you still need to protect yourself. Gloves are a must, especially when you're dealing with old, cracked glass. Eye protection is also a no-brainer. You don't want any shards flying into your eyes. A dust mask or respirator is a good idea too, especially if you're sanding or scraping off old paint. You don't want to be breathing in all that stuff.
Remember, reglazing windows isn’t just about making them look good; it’s about making them function well and last longer. With the right tools and a little bit of patience, you can totally do this and enjoy the benefits of a well-sealed, energy-efficient home.
Step-by-Step Guide to Removing Old Glazing
Safely Removing Old Glazing
Okay, so the first thing you gotta do is get rid of that old, crusty glazing. It's probably rock-hard and not looking too good. The key here is to take your time and be gentle. Start by using a putty knife to carefully chip away at the old glazing. If it's being super stubborn, grab a heat gun. But be careful! You don't want to overheat the glass, or you might end up with a crack. Just heat it up a little to soften it, and then try again with the putty knife. Think of it like you're performing surgery on your window.
Dealing with Stubborn Glazing
Sometimes, no matter how much you coax it, that old glazing just won't budge. Don't panic! There are a few tricks you can try. One thing that sometimes works is applying a little bit of linseed oil. Let it soak in for a few hours, or even overnight. The oil can help to soften the glazing and make it easier to remove. You can also try using a heat gun safely in short bursts, being extra careful not to overheat the glass. If all else fails, there are special tools you can buy that are designed to remove stubborn glazing, but honestly, patience and persistence usually do the trick.
Preparing the Window Frame
Alright, so you've finally managed to get all that old glazing off. Now it's time to get the window frame ready for the new stuff. This is a really important step, so don't skip it! First, give the frame a good cleaning. You want to remove any dust, dirt, or debris that might be hanging around. A wire brush can be helpful for getting into those nooks and crannies. Next, take a close look at the frame and see if there's any damage. Are there any cracks or signs of rot? If so, you'll need to repair them before you move on. A smooth, clean, and solid frame is essential for proper glazing adhesion. Otherwise, your new glazing won't stick properly, and you'll end up with leaks and other problems.
Think of preparing the window frame like prepping a canvas before painting. The better the prep work, the better the final result will be. Take your time, do it right, and your windows will thank you for it.
Mastering the Application of New Glazing

Kneading and Applying Glazing Compound
Alright, so you've got the old glazing out and the frame prepped. Now comes the fun part – applying the new glazing compound. Think of it like playing with clay. The key is to knead the compound until it's soft and pliable. Roll it into a rope, maybe around 3/4 inch thick. Don't stress if it's not perfect; you can always adjust as you go. It's all about getting that glazing compound ready to work with.
Techniques for Smoothing Glazing
This is where things can get a little tricky, but don't worry, you'll get the hang of it. Grab your putty knife and smooth that compound along the window pane. Keep the knife clean – a slightly wet knife works wonders. Some people even use a bit of glass cleaner. Hold the knife at an angle to slope the glazing away from the glass. This helps water run off and gives you a nice, clean finish. It's all about finding the right angle and pressure. You'll want to make sure you have the right tools for the job.
Ensuring a Weatherproof Seal
Getting a weatherproof seal is the whole point of reglazing, right? Here's how to make sure you're doing it right:
- Make sure the glazing compound is pressed firmly against both the glass and the window frame. No gaps allowed!
- Overlap the new glazing slightly onto the old glazing (if there's any left). This creates a stronger bond.
- After the glazing has skinned over (a few days, depending on the compound), you can paint it. Paint seals it even further.
A good seal isn't just about keeping the weather out; it's about preventing drafts and saving energy. Take your time and do it right.
And remember, regular window maintenance is key to keeping everything in good shape.
Troubleshooting Common Reglazing Issues
Fixing Uneven Glazing Lines
Uneven glazing lines can really throw off the look of your windows, making them look unprofessional. If you spot that the glazing isn't as smooth as you'd like, it might be necessary to redo it. A clean and slightly wet putty knife can be your best friend during application; it helps prevent the compound from sticking and pulling away from the glass. If the glazing has already dried with imperfections, don't panic! You can carefully shave off any high spots and then fill in the lower areas with some fresh compound. It's all about finesse and patience.
Addressing Cracks and Gaps
Cracks and gaps are a big no-no because they let in drafts and moisture, which completely defeats the purpose of reglazing. Here's how to tackle them:
- First, gently remove any cracked or loose sections using your trusty putty knife.
- Next, grab some new glazing compound, making sure you've kneaded it well to get it nice and pliable.
- Apply the compound, pressing it firmly into the gaps.
- Smooth it out for a seamless finish.
If you're still seeing gaps, it could be a sign that the window frame itself has shifted over time. It's worth checking for any structural issues that might need attention. You might need to look into window and door hardware to fix the issue.
It's important to remember that addressing cracks and gaps promptly not only improves the appearance of your windows but also prevents further damage from moisture and drafts. Taking the time to properly seal these openings can significantly extend the life of your reglazing work and improve your home's energy efficiency.
Preventing Future Problems
Want to keep your windows looking great for years to come? Regular maintenance is key. Here's what I recommend:
- Inspect your windows at least once a year for any signs of wear and tear.
- Keep an eye out for loose glazing or any new gaps that might be forming.
- Make sure to repaint any exposed wood to protect it from the elements.
Routine checks and touch-ups can really extend the life of your reglazing job. Think of it as preventative care for your windows! Also, make sure you are using a proper glazing bead to ensure a tight seal.
Finishing Touches: Painting and Maintenance
When and How to Paint Over Glazing
Okay, so you've reglazed your windows – awesome! But you're not quite done yet. Painting is the final step, and it's not just about making things look pretty. It's about protecting your work and making sure it lasts. You absolutely have to wait before you start painting.
Think of it like this: the glazing compound needs time to cure, like letting bread rise. Usually, a week is a good bet. This lets it form a skin, and if you skip this, you might end up with cracks later on. I usually go for a high-quality latex paint that's made for the outdoors. Latex is flexible and sticks well to the glazing. You can find a wide range of window and door hardware online.
Steps to Paint Over Glazing
Alright, here's the lowdown on painting:
- Lightly sand the glazing. This gives the paint something to grip onto. Don't go crazy, just a quick once-over.
- Apply your first coat. Here's a trick: overlap the paint onto the glass by a tiny bit, like 1/16 of an inch. This creates a seal that keeps water out.
- Let it dry completely. Seriously, don't rush this. Then, add a second coat.
Routine Maintenance for Longevity
So, you've painted your windows, and they look great. Now, how do you keep them that way? It's all about regular maintenance. Think of it like taking care of a car – a little effort now saves you big headaches later. Here's what I do:
- Inspect your windows every year. Look for peeling paint or cracks in the glazing. Catching these early can save you a lot of trouble.
- Clean your windows gently. I use mild soapy water. Harsh chemicals can damage the paint and glazing. Clean gently to avoid issues.
- Repaint every 5-7 years. This keeps the seal strong and the windows looking fresh.
Taking the time to properly finish and maintain your reglazed windows not only enhances their appearance but also significantly extends their lifespan. A little effort now can save you time and money in the long run.
Final Thoughts on Window Glazing
So, there you have it! Reglazing your windows might seem like a big task, but with a little patience and some practice, you can totally nail it. Just remember to take your time and follow each step carefully. Whether you’re smoothing out the putty or letting it cure, every part matters. Once you finish, your windows will not only look fantastic but also work better, keeping your home cozy and energy-efficient. Plus, there’s a real sense of pride in knowing you did it yourself. So grab those tools, take a deep breath, and get to glazing. You’ve got this!
Frequently Asked Questions
What is window reglazing?
Window reglazing is when you replace the old putty that holds the glass panes in a window frame. This helps keep the glass secure and makes the window better at keeping the air inside.
Why should I reglaze my windows?
Reglazing your windows can help save energy, stop drafts, and make your windows last longer. It also makes your home look nicer.
What tools do I need for window reglazing?
You will need a putty knife, some glazing compound, and maybe a heat gun to help remove the old glazing. Don't forget to wear gloves and goggles for safety!
How long does it take for glazing to dry?
The glazing compound usually takes about a week to dry enough for you to paint it, but it can take up to two weeks to fully cure, depending on the weather.
Can I paint over the glazing right away?
No, you should wait at least a week after putting on the glazing compound before you paint it.
What are common mistakes to avoid when reglazing?
Some common mistakes include not removing all the old glazing, using the wrong tools, and rushing the process. Take your time for the best results.