Maximize Your Space: The Ultimate Guide to Z Clips for Wall Panel Installation
When it comes to installing wall panels, using Z clips can make a world of difference. These handy little clips provide a secure and flexible way to hang panels, allowing for easy adjustments and removals when necessary. Whether you’re looking to enhance your home or workspace, understanding how to properly use Z clips can help you maximize your wall space effectively. In this guide, we’ll walk you through everything you need to know about Z clips, from their benefits to the installation process and beyond.
Key Takeaways
- Z clips are a versatile mounting solution for wall panels, allowing for easy adjustments.
- Proper surface preparation and accurate measurements are crucial for a successful installation.
- Follow a clear step-by-step process to mount Z clips and align panels correctly.
- Best practices include ensuring proper spacing and avoiding common installation mistakes.
- Z clips can be used creatively in various projects, including acoustic paneling and DIY designs.
Understanding Z Clips and Their Benefits
What Are Z Clips?
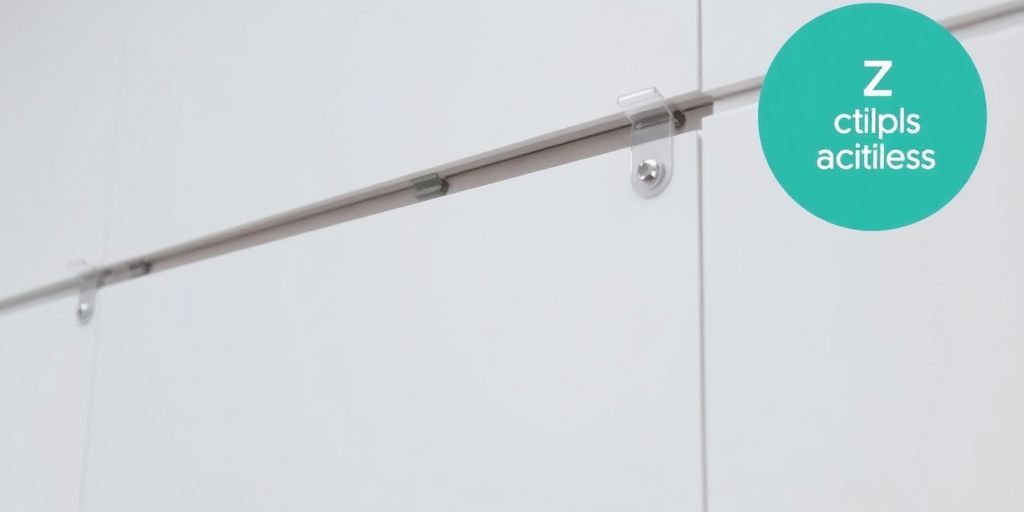
Okay, so what are Z clips? Basically, they're these clever little metal fasteners shaped like, well, a 'Z'. One part of the 'Z' gets attached to the wall, and the other part gets attached to whatever you're hanging – usually a panel. The beauty is that they interlock, creating a super secure, hidden mounting system. Think of them as a super-strong, invisible hook-and-loop system, but for heavier stuff. They're also sometimes called Z bar clips or interlocking clips, so if you hear those terms, they're probably talking about the same thing. You can find a range of Z Clip options to suit your needs.
Advantages of Using Z Clips
Why bother with Z clips? Here's the lowdown:
- Hidden Fasteners: No visible screws or nails. Clean, professional look.
- Removability: Panels can be easily removed for maintenance or replacement. This is a big plus if you need to access wiring or plumbing behind the panels.
- Strength and Security: They provide a really strong hold, especially important for heavier panels.
- Alignment: Z clips help keep panels aligned properly, preventing sagging or shifting over time.
Using Z clips is a great way to get a professional finish without a lot of hassle. They offer a good balance of strength, ease of use, and aesthetic appeal. Plus, the ability to remove panels later on is a huge advantage for many applications.
Common Applications for Z Clips
Z clips aren't just for one thing; they're pretty versatile. Here are some common places you'll find them:
- Wall Panels: Obvious, right? From decorative panels to acoustic paneling, Z clips are a go-to.
- Architectural Millwork: Installing intricate trim or molding? Z clips can help.
- Signage: Hanging signs securely and attractively.
- Artwork: A great way to hang large or heavy pieces of art without visible hardware.
Basically, if you need to hang something flat against a wall and want it to look good, Z clips are worth considering. They're a simple solution for a lot of different mounting challenges.
Preparing for Z Clip Installation

Before you even think about hanging those panels, getting your prep work right is super important. Trust me, a little planning goes a long way in avoiding headaches later on. It's like they say, measure twice, cut once – especially when it comes to fastener placement.
Tools and Materials Needed
Okay, first things first, gather your gear. You don't want to be halfway through and realize you're missing something. Here's a basic list:
- Z clips (obviously!). Make sure you have enough Monarch Z Clips for your project.
- A level. This is non-negotiable. Nobody wants crooked panels.
- Measuring tape. Accuracy is key.
- Pencil. For marking, duh.
- Drill with various bits. You'll need to pre-drill some holes.
- Screwdriver (or drill with screwdriver bits). For securing the clips.
- Safety glasses. Protect those peepers!
- Stud finder (if you're attaching to studs).
Surface Preparation Tips
Now, let's talk about the surface you're attaching to. Is it drywall? Concrete? Wood? Whatever it is, make sure it's clean, dry, and structurally sound.
- For drywall, locate the studs. Use a stud finder, and mark them clearly. You want to anchor into those studs whenever possible.
- For concrete, you'll need a hammer drill and appropriate anchors. Don't skimp on the anchors; they're what's holding everything up.
- For wood, make sure it's not rotten or warped. Replace any damaged sections before you start.
Proper surface prep is the foundation of a successful Z clip installation. Take the time to do it right, and you'll be rewarded with a secure and professional-looking result.
Measuring and Marking for Accuracy
This is where the magic happens. Accurate measurements and markings are crucial for aligning panels correctly. Take your time, double-check everything, and don't be afraid to ask for help if you need it.
- Determine the placement of your panels. Consider the overall design and any specific requirements.
- Measure the distance between the Z clips on the panel. This will determine the spacing of the clips on the wall.
- Use a level to draw horizontal lines on the wall, indicating the position of the clips. Make sure these lines are perfectly level!
- Mark the exact location of each clip on the lines. Use a pencil and make clear, precise marks.
- Before you start drilling, double-check all your measurements and markings. It's easier to erase a pencil mark than to fix a misplaced hole.
Step-by-Step Z Clip Installation Process
Mounting the Z Clips
Okay, so you've got your Z clips, your panels, and a general idea of where things need to go. Now it's time to actually attach those clips! First, decide whether you're using individual clips or continuous Z-bar clips. Individual clips are good for smaller panels or when you need more flexibility in placement. Continuous clips offer more support for larger panels.
- Mark the locations where the clips will go on both the wall and the back of your panel. Accuracy is key here, so measure twice, install once!
- For wall mounting, use appropriate screws or anchors depending on your wall type (drywall, concrete, etc.). Make sure the screws are long enough to securely hold the clip and panel weight.
- For panel mounting, pre-drill pilot holes to prevent splitting the panel material. Then, attach the clips with screws. If you're using adhesive in addition to screws, apply it to the back of the clip before attaching it to the panel.
It's a good idea to use a level when mounting the wall clips to ensure your panels will be straight. Nothing looks worse than a crooked wall panel!
Aligning Panels with Z Clips
This is where the magic happens! With the Z clips mounted on both the wall and the panel, it's time to bring them together.
- Carefully lift the panel and align the clips on the back of the panel with the corresponding clips on the wall.
- Gently push the panel towards the wall until the clips interlock. You should hear a click or feel the clips engage.
- If the panel doesn't align properly, don't force it. Double-check your measurements and clip placement. Slight adjustments might be needed.
Securing Panels in Place
Once the panels are aligned and the Z clips are engaged, you might want to add an extra layer of security, especially for larger or heavier panels.
- Inspect the panel to ensure it's flush against the wall and that all the clips are properly engaged.
- For added security, consider using construction adhesive between the panel and the wall. This will provide a stronger bond and prevent the panel from shifting over time.
- If you need to remove a panel later, you can usually do so by gently lifting it upwards to disengage the clips. However, if you've used adhesive, you might need to carefully pry the panel away from the wall, potentially damaging the panel or the wall in the process. Plan accordingly!
Best Practices for Using Z Clips
Ensuring Proper Spacing
Getting the spacing right is super important when you're using Z clips. Too much space, and your panels might sag or not sit flush; too little, and you'll struggle to get them on at all. I usually start by figuring out the weight of the panel and then checking the manufacturer's recommendations for spacing. For heavier panels, you'll need more clips, closer together. I've found that using a level and measuring tape to mark the spots for each clip makes a huge difference. It's a bit tedious, but it saves a lot of headaches later on. Think of it like this: you're building a solid foundation for your panels, and spacing is key. For Z-Clip Mounting, precision is key.
Avoiding Common Mistakes
Okay, so I've made my fair share of mistakes with Z clips, and I'm here to tell you how to avoid them. One big one is not using the right screws. You need screws that are long enough to get a good grip but not so long that they poke through the other side of your panel. Another mistake? Not aligning the clips properly. If they're even slightly off, your panels won't sit right. I always double-check my measurements and use a laser level to make sure everything is lined up. Also, don't rush! Take your time, and you'll get much better results. Remember the old saying, “measure twice, but cut once,” specially for fastener placement.
Adjusting Panels After Installation
One of the best things about Z clips is that you can adjust the panels even after they're up. If you notice a panel is a little crooked or not quite flush, you can usually loosen the screws on the clips and make small adjustments. Sometimes, you might need to add a shim behind one of the clips to get everything perfectly level. It's also a good idea to check the panels periodically, especially in areas with changing humidity. Wood can expand and contract, which can sometimes cause panels to shift. A quick adjustment can keep everything looking great. For sound abatement applications, providing adequate standoff is important.
Z Clips for Acoustic Paneling
Benefits of Acoustic Panels
Acoustic panels are a game-changer for managing sound in any space. They work by absorbing sound waves, reducing echo and reverberation. This makes speech clearer and environments more comfortable. Think about a restaurant where you can actually hear the person across from you, or an office where you aren't distracted by constant noise. That's the power of acoustic panels. They come in various materials, sizes, and designs, so you can find options that fit both your functional needs and aesthetic preferences. The right panels can transform a noisy, chaotic room into a calm, productive area. Plus, they can be easily integrated into existing spaces, making them a practical solution for noise control.
- Improved speech clarity
- Reduced echo and reverberation
- Enhanced comfort in noisy environments
Installation Techniques for Acoustic Panels
When it comes to installing acoustic panels, Z clips offer a flexible and effective solution. Z clips allow for easy removal and adjustment of panels, which is super handy if you need to access wiring or make changes later on. The basic idea is that one clip is attached to the wall and the other to the back of the panel; they then interlock to hold the panel in place. For optimal sound abatement, consider using standoff Z-clip to create a gap between the panel and the wall. This gap can be filled with additional acoustic material, further enhancing sound absorption. Here's a quick rundown of the installation process:
- Measure and mark the locations for the Z clips on both the wall and the panels.
- Attach the Z clips to the wall, ensuring they are level and securely fastened.
- Attach the mating Z clips to the back of the acoustic panels.
- Carefully align the panels and slide them onto the wall-mounted clips.
Using continuous length Z Clips, evenly spaced, can help distribute the weight of the panel and prevent bowing, especially for larger panels. Remember to leave a small gap between panels to allow for expansion and contraction.
Maintaining Acoustic Performance
To keep your acoustic panels working their best, regular maintenance is key. Dust and debris can accumulate on the surface, reducing their sound-absorbing capabilities. A simple vacuuming or wiping with a damp cloth can do wonders. Also, check the Z clips periodically to ensure they are still securely holding the panels in place. If you notice any loose clips, tighten or replace them as needed. Avoid using harsh chemicals or abrasive cleaners, as these can damage the panel material and affect its acoustic properties. With a little care, your acoustic panel installation will continue to provide excellent sound control for years to come.
- Regularly vacuum or wipe down panels to remove dust.
- Check Z clips for tightness and replace if necessary.
- Avoid harsh chemicals that can damage the panel material.
Troubleshooting Z Clip Issues
Identifying Common Problems
Okay, so you've installed your Z clips, and something isn't quite right. Don't panic! A few common issues pop up. One of the most frequent is misalignment. This happens when the clips on the wall and the panel don't line up perfectly, making it difficult or impossible to hang the panel. Another issue is loose clips. If the screws aren't properly secured or the wall material isn't strong enough, the clips can wobble or even pull out. Finally, sometimes panels can be difficult to remove after installation, which can be a problem if you need to access something behind them or make adjustments. Identifying these problems early is key to easy panel removal.
Solutions for Misalignment
Misalignment can be a real headache, but it's usually fixable. First, double-check your measurements. It sounds obvious, but it's easy to make a mistake. If the misalignment is slight, you might be able to adjust the position of the clips on the wall by loosening the screws slightly and shifting them. For larger misalignments, you might need to remove the clips and re-mount them in the correct position. Consider using a laser level to ensure perfect alignment when re-mounting. If the issue is with the clips on the panel, you might need to re-position those as well. Remember the old saying, "measure twice, cut once"? It applies here too!
Repairing Damaged Panels
Accidents happen. If a panel gets damaged during or after installation, don't assume it's a total loss. Small scratches or dents can often be repaired with wood filler or touch-up paint. If the damage is more significant, like a crack or a hole, you might need to replace the entire panel. Before replacing, assess whether the damage affects the panel's structural integrity. If the panel is still structurally sound, you might be able to reinforce it from behind with a piece of plywood or metal. Here's a quick guide:
- Minor Scratches: Use a scratch repair kit.
- Small Dents: Try steaming the dent to raise the wood fibers.
- Cracks: Apply wood glue and clamp until dry.
Dealing with damaged panels can be frustrating, but with a little patience and the right tools, you can often restore them to their original condition or at least make the damage less noticeable. Remember to always wear safety glasses and gloves when working with power tools or adhesives.
Innovative Uses of Z Clips

Creative Panel Designs
Z clips aren't just for basic wall paneling; they open up a world of creative design possibilities. Think beyond flat walls and consider using Z clips to create textured surfaces, floating panels, or even modular art installations. You can use panels of varying thicknesses and materials to add depth and visual interest to any space. Experimentation is key here. Imagine a reception area with a dynamic, ever-changing wall design, easily reconfigured thanks to the flexibility of Z clip mounting.
- Create a 3D effect by layering panels of different depths.
- Use contrasting materials like wood, metal, and fabric for a unique look.
- Design a modular system that allows for easy rearrangement and customization.
Z Clips in Commercial Spaces
Commercial spaces demand both functionality and aesthetics, and Z clips deliver on both fronts. They're perfect for creating easily updatable displays in retail environments, allowing for quick changes to promotional materials or product showcases. In offices, Z clips can be used to install acoustic paneling that improves sound quality while adding a touch of modern design. Restaurants and hotels can benefit from the ease of maintenance and replacement that Z clips offer, ensuring that their interiors always look their best.
Z clips offer a practical solution for commercial spaces needing adaptable and visually appealing interiors. Their ease of use and flexibility make them a favorite among designers and contractors alike.
Z Clips for DIY Projects
Don't think Z clips are just for professionals! They're incredibly useful for a wide range of DIY projects around the home. From creating custom headboards and shelving units to mounting artwork and mirrors, Z clips provide a secure and easy-to-use mounting solution. Their hidden design ensures a clean, professional finish, even for novice DIYers. Plus, the ability to easily remove and reposition items makes them ideal for renters or anyone who likes to change up their decor frequently. Consider using Z-Clip Mounting for your next project.
- Mounting heavy mirrors or artwork securely.
- Creating custom headboards with fabric or wood panels.
- Building modular shelving units that can be easily reconfigured.
Wrapping It Up
So there you have it! Installing wall panels with Z clips can really change the game for your space. It’s all about getting the right tools and following the steps carefully. Remember to measure twice and drill once to avoid any mishaps. Whether you’re looking to soundproof a room or just want to spruce things up, Z clips give you that flexibility. Plus, they make it easy to swap out panels if you ever want a change. So, roll up your sleeves and get started on your project. You’ll be amazed at how much of a difference it can make!
Frequently Asked Questions
What are Z Clips?
Z Clips are special metal clips used to hang wall panels securely. They help hold the panels in place while allowing for easy removal and adjustment.
What are the advantages of using Z Clips?
Z Clips make it easy to install panels without visible fasteners. They also allow for adjustments and can help with soundproofing.
Where are Z Clips commonly used?
You can find Z Clips in homes, offices, and commercial buildings. They are great for hanging decorative panels, acoustic panels, and more.
What materials do I need for Z Clip installation?
You will need Z Clips, screws, a drill, a level, a measuring tape, and possibly construction adhesive depending on your panels.
How do I ensure my panels are aligned correctly?
Carefully measure and mark where the Z Clips will go. Use a level to make sure everything is straight before securing the panels.
What if my panels are not aligned after installation?
If your panels are misaligned, you can adjust them by loosening the screws on the Z Clips and repositioning the panel as needed.