Step-by-Step Guide to Install Drawer Slides in Old Cabinets for a Modern Touch
If you're looking to give your old cabinets a fresh, modern look, installing new drawer slides can make a big difference. It might seem like a daunting task, but with the right approach, you can do it yourself. This guide will walk you through the entire process, from prepping your cabinets and choosing the right slides to the installation steps. Let’s get started on transforming those cabinets!
Key Takeaways
- Remove old hardware before starting the installation.
- Measure accurately to ensure proper alignment of the slides.
- Choose the right type of slides based on your needs.
- Take your time when installing to avoid mistakes.
- Test the drawer after installation to ensure smooth operation.
Preparing Your Drawer And Cabinet
Before diving into the drawer slide installation, some prep work is needed. This ensures a smooth process and a great final result. Trust me, a little effort here saves headaches later.
Removing Existing Hardware
First, you've gotta get rid of the old stuff. Carefully remove the drawers from the cabinet. Unscrew any existing slides, handles, or other hardware. Keep all the screws and parts organized – a small container or labeled bags work wonders. If anything's stuck, don't force it; a little patience and maybe some WD-40 can help.
Measuring And Marking The Center
Accuracy is key! Grab your measuring tape. Find the center point on both the drawer and the cabinet opening. This is where your new slides will align. Use a pencil to mark these center points clearly. A level is your best friend here – make sure those lines are straight! This step is super important for proper drawer alignment.
Ensuring A Clean And Smooth Surface
Before installing anything, check the surfaces where the slides will attach. Sand down any rough spots, splinters, or old glue. Wipe away all dust and debris. A clean, smooth surface ensures the slides glide easily and attach securely. You don't want any bumps or gunk interfering with the smooth operation of your new drawers.
Taking the time to prep your drawers and cabinets properly is like laying a solid foundation for a house. It might seem tedious, but it makes the whole project easier and more successful in the long run.
Choosing The Right Drawer Slides
Types Of Drawer Slides
When you're looking at drawer slides, there are a few main types to think about. Ball-bearing slides smooth operation are popular because they work smoothly and last a long time. They're good for drawers that hold heavy stuff, like pots and pans in the kitchen. Then there are undermount slides, which you can't see, so they look neat. They can be a bit harder to put in, but it's worth it if you want a clean look. And finally, there are side-mount slides, which you can see, but they're easy to install and change if you need to.
Factors To Consider When Selecting Slides
When picking out drawer slides, quality is super important. Good drawer slides make sure things move smoothly and last. You want something that can hold the weight of what's in your drawer without it sagging or getting stuck. Here's what to keep in mind:
- Material: Get slides made of strong stuff like steel.
- Load Capacity: Make sure the slides can handle the weight of your drawer when it's full.
- Length: Pick slides that are the same depth as your cabinet.
Taking the time to maintain your drawer slides can add years to their life. A little attention now prevents bigger headaches later, ensuring your drawers remain a functional part of your home for years to come.
Understanding Inset Vs Overlay Installation
Figuring out if your drawer front will be inset or overlay is a big deal. This choice changes the length of slides you'll need. Measure how deep your drawer space is and take off about an inch so the drawer doesn't hit the back. If you're doing an inset front, take off another 3/4 inch. For example, if your space is 16.5 inches deep, you'll want slides that are about 14.75 inches long. You can find cheap replacement kitchen drawers online, where you can specify the exact dimensions and materials.
Step-By-Step Installation Process
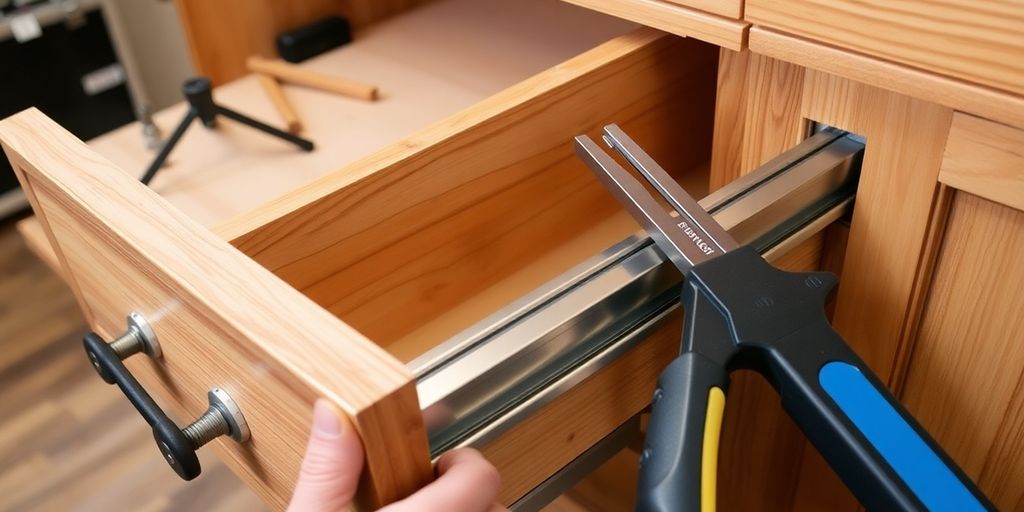
Attaching Slides To The Drawer
Alright, let's get these slides on the drawer itself. First, you'll want to grab your trusty measuring tape and a pencil. Measure the length of the drawer and note the distance from the top edge of the cabinet to the top of the drawer. Mark these measurements on both sides of the drawer to make sure the slides go on evenly. Now, get your drill ready. Attach the drawer members to the sides of the drawer, aligning them with your marks. Make sure they're level and spaced out evenly on both sides. I usually use #6 x ⅝″ wood screws for this, so they don’t poke out the other side. Don't overtighten the screws; you don't want to strip the wood.
Securing Slides Inside The Cabinet
Time to move onto the cabinet. The cabinet members need to be installed at the same height and level as the drawer members. Accuracy is key here. Use a level to double-check everything before you start drilling. Once everything lines up, secure the cabinet members in place. This part is crucial because if things are off, the drawer won't slide smoothly. I like to use a spacer block to ensure consistent placement, especially if I'm doing multiple drawers.
Finalizing The Drawer Installation
Now for the moment of truth! Carefully slide the drawer into the cabinet, aligning the drawer slides with the cabinet slides. If everything is aligned correctly, the drawer should slide in smoothly without any resistance. If you encounter any issues, don't force it. Instead, remove the drawer and double-check your measurements and alignment. Once the drawer is fully inserted, test the drawer slides by opening and closing it several times to ensure smooth operation.
Aligning The Drawer Front

Getting the drawer front aligned correctly is super important for that finished, professional look. It's about making sure everything sits flush and even, so your drawers don't look wonky. It might seem like a small thing, but it makes a huge difference in how your cabinets look and feel. Let's get into it.
Positioning The Drawer
First things first, carefully position the drawer front. You want to make sure there's a consistent gap all around the edges. This is where having a good eye and a measuring tape comes in handy. Think about whether you're going for an inset or overlay look, as this will affect how you position the front. For inset drawers, you want the front to sit perfectly inside the frame, while overlay drawers will, well, overlay the frame. It's all about that consistent reveal.
Using Clamps For Stability
Clamps are your best friends here. Once you've got the drawer front where you want it, use clamps to hold it in place temporarily. This frees up your hands to double-check everything and make sure nothing shifts while you're working. I like to use a couple of clamps on each side to really secure it. It's also a good idea to use some padding between the clamps and the drawer front to avoid any scratches or dents.
Double-Checking Alignment
This is the most important step: double, triple, quadruple-check the alignment before you start drilling any holes. Seriously, take your time. Step back, look at it from different angles, and make sure everything is perfect. Once you drill those holes, there's no going back. Consider these points:
- Are the gaps consistent all around?
- Is the drawer front flush with the cabinet frame (or properly overlaying, if that's your style)?
- Does it look visually appealing?
If something doesn't look right, now's the time to fix it. A little extra time spent here can save you a lot of headaches later on. Trust me, I've learned this the hard way.
Testing And Adjusting The Installation

Sliding The Drawer In And Out
Alright, moment of truth! Time to see if all that hard work paid off. Carefully slide the drawer in and out a few times. You're looking for smooth, effortless movement. Does it glide like butter, or does it feel like you're wrestling an alligator? If it's the latter, don't panic! That's what this step is for. Pay close attention to any sticking points, wobbles, or unusual noises. These are clues that something needs adjusting. Make sure the drawer slides smoothly without any major resistance.
Making Necessary Adjustments
So, the drawer isn't perfect? No biggie. Now's the time to get things dialed in. First, check all your screws. Are any loose? Tighten them up! Sometimes that's all it takes. If the drawer is sticking, try loosening the screws on the drawer slides slightly and wiggling the drawer around to see if you can find a better position. You might need to add shims (thin pieces of wood or cardboard) behind the slides to adjust their alignment. A little bit of tweaking can make a huge difference.
Ensuring Smooth Operation
Okay, you've tightened screws, added shims, and wiggled things around. Now, slide that drawer in and out again. Is it better? Hopefully! Keep making small adjustments until the drawer operates smoothly and quietly. Make sure it closes completely and sits flush with the cabinet frame. Also, check that it doesn't sag or tilt when it's fully extended. If it does, you might need to reinforce the slides or adjust their position. This part can be a bit tedious, but trust me, it's worth it in the end. A well-functioning drawer is a beautiful thing.
Don't rush this step! Taking the time to fine-tune your installation will result in drawers that not only look great but also function flawlessly for years to come. Patience is key!
Tips For A Successful Installation
Using Quality Tools
Investing in good tools makes a huge difference. Don't skimp on the basics. A decent screwdriver, a reliable level, and a precise measuring tape are essential. Cheap tools can slip, strip screws, and generally make the job way harder than it needs to be. Trust me, you'll thank yourself later.
Maintaining A Safe Workspace
Safety first, always! Clear your workspace of clutter. Make sure you have good lighting. And for goodness' sake, wear safety glasses. You don't want sawdust or metal shavings in your eyes. Gloves are also a good idea to protect your hands. A clean and well-lit workspace will help you focus and avoid accidents. Before you start, make sure you have the right safety gear.
Taking Your Time With Measurements
Don't rush the measuring process. Double-check, triple-check, and then check again. Accurate measurements are the key to a successful drawer slide installation. If your measurements are off, the drawer won't fit properly, and you'll end up with a frustrating mess. Remember, it's better to spend a little extra time measuring than to redo the whole job.
Patience is key. Rushing through the installation will only lead to mistakes and frustration. Take your time, follow the steps carefully, and don't be afraid to ask for help if you get stuck.
Wrapping It Up
So there you have it! Installing drawer slides in your old cabinets isn't as tough as it seems. With a bit of patience and some basic tools, you can give your drawers a fresh, modern feel. Just remember to measure twice, drill carefully, and take your time with the adjustments. Once everything is in place, you'll be amazed at how smoothly your drawers operate. It’s a small upgrade that can make a big difference in your kitchen or any room. Now, go ahead and tackle that project—you've got this!
Frequently Asked Questions
What tools do I need to install drawer slides?
You'll need basic tools like a screwdriver, a measuring tape, a drill, and a level. Having a pencil for marking is also helpful.
How do I remove old drawer slides?
To remove old slides, take out the drawers and unscrew the slides from both the drawer and the cabinet. Make sure to keep all screws organized.
What type of drawer slides should I use?
There are different types of slides like ball-bearing, undermount, and side-mount. Ball-bearing slides are great for heavy loads, while undermount slides are hidden for a clean look.
How do I measure for new slides?
Measure the drawer's depth and subtract about an inch to get the right slide length. If your drawer front is inset, subtract an extra 3/4 inch.
Can I install drawer slides by myself?
Yes, you can install drawer slides on your own! Just take your time, follow the steps carefully, and make sure to measure accurately.
What should I do if the drawer doesn't slide smoothly?
If the drawer doesn't slide well, check the alignment and make sure everything is level. You might need to adjust the slides or check for any obstructions.