
Looking for help?
Find answers to your questions
- A Comprehensive Guide to Jalousie Window Hardware Repair
- Acorn Window Systems, Inc. OUT OF BUSINESS! Replacement Parts to Fix Those Old Windows
- Apex Extended Block and Tackle and Standard Block and Tackle Balances, Whats the Difference?
- Bifold Door Hardware: The Ultimate Guide to Choosing and Installing
- Comprehensive Guide to the Parts of a Window - Everything You Need to Know No BS!
- Custom Window Repair: Preserving the Elegance and Functionality of Residential Windows
- Decoding Spiral Window Balance Tip Colors for Optimal Window Support
- Do Picture Windows Have Weep Holes?
- Enhance Your Living Space with Crestline Patio Door Replacement Parts
- Enhancing Home Comfort: A Guide to Double Door Weatherseal Repair
- Enhancing Home Security with Double Hung Window Locks
- Enhancing Home Security: A Guide to Keyed Window Lock Repair
- Enhancing Your Home with JELD-WEN Patio Door Replacement Parts
- Fixed Windows vs. Operable Windows in Residential Window Repair: Understanding the Choice
- Fixing Stripped Casement Window Crank Hardware
- Graham Architectural Window Products: A Comprehensive Review
- How Does a Sash Lock Work?
- How Much Are Screens for Windows? A Comprehensive Guide
- Let There Be Light: Skylight Repair for Residential Windows
- Malta Windows: The Ultimate Guide to Choosing the Right Windows for Your Home
- Mastering Home Window Repair: A Guide to Balance Take Out Clips
- Maximize Your Closet Space with Durable and Stylish Sliding Closet Doors: A Comprehensive Guide
- Maximize Your Property Value with Expert Window Services from Window Repair Systems
- Protect Your Home with the Best Window Hardware: Locks, Latches, and Hinges
- Renewing Your Home: A Guide for Repairing Windows and Elevating with Window Blinds
- Residential Window Repair: Understanding Casement Window Hardware
- Restoring Beauty & History with Stained Glass Window Repair
- Restoring the Integrity of Your Home: Rotting Window Repair
- Soundproof Window Repair: Reviving Tranquility in Your Home
- The Importance of the Flared Pivot Bar in Window Hardware
- The Importance of Window Weight in Home Window Repair
- The Significance of Window Balance Shoes for Smooth Operations
- The Significance of Winged Guides in Block & Tackle Window Balances
- The Ultimate Guide to Basement Window Repair
- The Ultimate Guide to Door Weatherstripping: Find the Best Option for Your Home
- Tips to Safely Leave Your Windows Open at Night
- Traco Window Parts: Everything You Need to Know
- Understanding Coil Spring Window Balances: What is a Coil Stamp?
- Understanding Double Hung Window Sizes: Finding the Perfect Fit for Your Home
- Understanding Milgard Window Balances: A Comprehensive Guide
- Understanding Single Hung Window Sizes: A Comprehensive Guide
- Understanding Window Operator Types for Efficient Window Repair
- Vinyl Window Replacement Parts: The Key to Maintaining Function and Efficiency
- Weatherproofing Windows: A Comprehensive Guide to a Cozier Home
- Weatherstripping Guide: Improving Energy Efficiency in Your Home
- What Happens If You Cover Weep Holes? Hidden Dangers of Blocking Window Drainage
- What is a Casement Window? Improve Ventilation & Energy Efficiency
- What Is Window Glazing? A Look at Glazing Beads and Their Role in Windows
- Which Way Should Casement Windows Open? A Comprehensive Guide
- Which Way to Install Door Hinges: A Simple Guide for Beginners
- Window Hardware for Home Window Glass Repair
- Window Replacement Costs: A Comprehensive Guide to Understanding the Costs Involved
- Window Screen Repair Parts: The Ultimate Guide to Fixing Your Screens
- Architectural Specification Writing for Commercial Window Repair - Window Repair Systems
- Glazing Channels and Glazing Rubbers
- How to Determine the Length of a Window Balance without Having the Balance
- How to Identify & Fix Vinyl Tilt Windows with Inverted Block & Tackle Balances
- How to Measure Spiral Window Balances
- How to Remove Tilt Window Pivot Lock Shoes - Window Repair Systems
- How to Replace a Front Mount Casement Window Operator and Track
- How to Replace and Install Spiral Window Balances in a Tilt Window
- How to Replace Block and Tackle Window Balances
- How to Rescreen a Screen Door or Window Using a Screen Repair Kit - Window Repair Systems
- Jambliner Replacement for Pella Window, a How-To for a Tilt Window
- Jambliners for a Non-Tilt Window
- Jambliners for a Tilt Window
- Learn How to Assemble Window Hardware Direct's Replacement Tilt Jambliner Set!
- Pivot Lock Shoes
- Questions and Answers Ep. 1 - Window Repair Systems
- Questions and Answers Ep. 2 - A little SPRING in your Step!
- Replacing a Spiral Window Balance in a Non-Tilting Window
- Turbo2™ Window Balances
- Ultra Lift Window Balances
- Waldorf Astoria NYC - Stories From the Field Ep 1 - Window Repair Systems
- Weird Parts with Greg Ep. 1 - Gas Tube Window Balances - Window Repair Systems
- What Does the Stamp on a Block and Tackle Balance Mean?
- What is a Sash Cam and How to Select the Correct Sash Cam
- Window Security - Bandit Bar
- Window Sweep Locks and Keepers
-
Window Balances & Sash Support
- 77 Series Single Coil Spring Balance Assembly & Installation
- 96 Series Screw-In Constant Force Balance Assembly & Installation
- Caldwell Roller-Tilt Constant Force Balance Installation Instructions
- How to Determine the Length of a Window Balance from Sash Height
- How to Fix a Bowed Window Frame: A Step-by-Step Guide
- How to Fix a Crank Window That Won't Open: A Step-by-Step Guide
- How to Install Series 37 Quick-Tilt Coil Spring Window Balances Step by Step
- How to Lock a Hopper Window: A Simple Guide for Homeowners
- How to Lubricate Casement Windows: A Step-by-Step Guide
- How to Measure Block & Tackle Window Balances
- How to Measure Spiral Window Balances
- How to Remove a Double-Hung Window Sash
- How to Remove a Fixed Window Sash: A Step-by-Step Guide
- How To Remove Coil Spring Window Balances: Step by Step Guide
- How to Repair Awning Windows: A Step-by-Step Guide
- How to Replace Inverted Block and Tackle Balances
- How to Replace Non-Tilt Block and Tackle Window Balances
- How to Replace Non-Tilting Spiral Window Balances
- How to Replace Tilt Block and Tackle Balances
- How to Replace Tilting Spiral Window Balances
- S152 Series Screw-In Constant Force Balance Assembly and Installation
- DIY Window Tilt Latch Replacement: A Step-by-Step Guide
- How to Change Sliding Window Roller: A Step-by-Step Guide
- How to Measure Pivot Lock Shoes and Pivot Bars
- How To Measure Window Tilt Latches
- How to Open a Tilt Latch Window: A Step-by-Step Guide
- How to Replace a Front Mount Casement Window Operator and Track
- How to Replace Internal Tilt Latches in Your Windows: A Step-by-Step Guide
- How to Select Block and Tackle Balance Top and Bottom Guides
- Mastering the Art: How to Measure a 4-Bar Hinge for Windows
- What is a Window Sash Cam and How to Install a Sash Cam
- How to Fix a Door That Sticks: A Step-by-Step Guide
- How to Fix Sliding Screen Door Issues with Ease
- How to Replace a Patio Door Handle: A Step-by-Step Guide
- How to Replace a Patio Door Roller
- How to Replace Patio Door Lock: A Step-by-Step Guide
- How to Replace Rollers on an Aluminum Sliding Glass Door
- How to Adjust a Screen Door Closer: A Step-by-Step Guide
- How to Install a Screen Door Handle: Step-by-Step Guide
- How to Measure Window Screen Size: A Step-by-Step Guide
- How to Remove Window Screen with Plunger Pins: A Step-by-Step Guide
- How to Stop Condensation on a Storm Door: Effective Solutions
- Sealing the Gap: The Benefits of Door Sweeps and How to Install Them
- How to Install Door Insulation: Guide to a More Energy-Efficient Home
- How to Replace Weatherstripping on a Window or Door
How to Measure Pivot Lock Shoes and Pivot Bars
How to Measure Pivot Lock Shoes and Pivot Bars
Pivot lock shoes and pivot bars work together in many tilt-window systems. The pivot bar extends from the lower corner of the sash and fits into the cam of the pivot lock shoe inside the jamb.
When the sash is tilted inward, the pivot bar rotates the cam and helps lock the shoe in place. Because the two parts must fit each other as well as the sash and jamb, accurate measurements are important when selecting replacements.
A digital caliper provides the most precise measurements for these small components, but a ruler with clear fractional markings may also be used when a caliper is unavailable.
Before You Start
Tools and information you may need:
- Digital caliper, ruler, or tape measure
- Original pivot lock shoe
- Original pivot bar
- Paper or notes app for recording dimensions
- Phone or camera for reference photos
- Any visible part numbers, logos, or markings
- Photos showing where each part was installed
Important: Do not select a replacement based on one measurement alone. Pivot lock shoes with similar width and thickness may use different cams, balance connections, brake designs, or jamb profiles.
Pivot bars may also differ in tip shape, overall length, mounting-hole pattern, offset, and sash attachment style.
Understanding How the Parts Work Together
The pivot lock shoe travels vertically inside the jamb channel and connects the sash to the window-balance system. Its metal or plastic cam accepts the end of the pivot bar.
The pivot bar is normally attached to or inserted into the lower corner of the sash. When the sash tilts, the bar rotates inside the cam and causes the shoe to lock against the jamb.
A correct replacement combination must meet three requirements: the shoe must fit the jamb, the pivot bar must fit the sash, and the pivot-bar tip must fit the shoe cam.
How to Measure a Pivot Lock Shoe
Step 1: Measure the Shoe Width
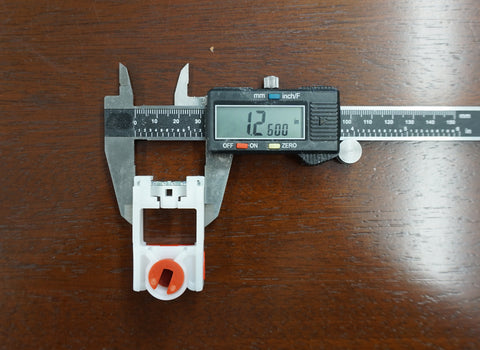
Position the caliper across the widest part of the shoe body. Measure from one outer side to the other while keeping the caliper jaws square to the part.
- Close the caliper and confirm that it reads zero.
- Place the shoe flat on a stable surface.
- Measure the body at its widest point.
- Do not squeeze the plastic hard enough to distort it.
- Record the measurement to at least two decimal places.
The example shoe shown measures approximately 1.26 inches wide.
Step 2: Measure the Shoe Thickness

Turn the shoe on its side and measure the thickness of the main body at its widest point.
Do not include the projecting cam housing, brake tabs, raised ribs, or other localized protrusions unless a product listing specifically requests that dimension.
- Place the caliper jaws against the flat sides of the shoe body.
- Keep the jaws parallel.
- Measure the widest portion that must fit inside the jamb pocket.
- Record any separate protruding dimensions in your notes.
The example shoe body measures approximately 0.63 inch thick.
Step 3: Measure the Cam Slot

Measure the opening in the cam where the end of the pivot bar is inserted.
- Position the smaller caliper jaws inside the cam slot.
- Open the jaws gently until they contact both sides.
- Keep the caliper aligned with the slot.
- Record the slot width.
- Photograph the shape and orientation of the cam.
If the cam has a rectangular, cross-shaped, oval, stepped, or irregular opening, measure each relevant side rather than recording only one dimension.
The straight cam slot shown measures approximately 0.18 inch wide.
Record the Remaining Shoe Details
Width, thickness, and cam size are the primary dimensions, but other features may be equally important when several shoes are close in size.
Also document:
- Overall shoe height
- Cam shape, material, and color
- Position of the cam within the shoe
- Open- or closed-cam design
- Brake pads, tabs, wings, or locking features
- Balance attachment method
- Coil, spiral, or block-and-tackle application
- Any numbers, logos, or molded markings
- Original orientation inside the jamb
How to Measure a Pivot Bar
Step 4: Measure the Pivot-Bar Tip

Measure the end of the pivot bar that enters the cam of the pivot lock shoe.
- Place the caliper jaws across the narrow tip.
- Measure the tip at the section that actually sits inside the cam.
- Record its thickness and width separately when the tip is rectangular.
- Measure every side of an irregular or stepped profile.
- Photograph the tip from the end and side.
The pivot-bar tip should enter the cam without binding, while avoiding excessive looseness that could allow the sash to shift or disengage.
The example pivot-bar tip measures approximately 0.17 inch and fits the approximately 0.18-inch cam slot shown above.
Step 5: Measure the Overall Pivot-Bar Length

Measure the pivot bar from its farthest end to its opposite end.
- Lay the pivot bar flat.
- Position the caliper jaws at the two longest points.
- Keep the tool parallel with the pivot bar.
- Record the full overall length.
- Also record the distance from the sash mounting area to the cam-engaging tip.
The example pivot bar measures approximately 2.99 inches long.
Step 6: Measure the Pivot-Bar Width

Measure across the widest portion of the pivot-bar body or mounting plate.
- Identify the widest section of the part.
- Position the caliper perpendicular to the pivot bar.
- Measure from one outer edge to the other.
- Record narrower sections separately when their profile affects installation.
The widest portion of the example pivot bar measures approximately 1.18 inches.
Record the Mounting and Profile Details
The same overall measurements may appear on pivot bars that mount differently or position the cam-engaging tip at a different location.
Also document:
- Number of mounting holes
- Center-to-center mounting-hole spacing
- Distance from each hole to the nearest edge
- Hole diameter and screw-head style
- Flat, stepped, flared, round, or rectangular tip profile
- Offset between the mounting plate and tip
- Die-cast, stamped-steel, or other construction
- Left-hand, right-hand, or non-handed design
- Screw-in, slide-in, snap-in, or slot-mounted installation
- Any part numbers or manufacturer markings
Match the Pivot Lock Shoe and Pivot Bar as a System
A pivot bar that fits into a cam is not automatically the correct replacement. The complete combination must also fit the window.
Confirm that:
- The shoe width and thickness fit the jamb channel.
- The shoe connects to the correct balance type.
- The pivot-bar tip matches the cam opening and profile.
- The bar fits the original sash mounting location.
- The mounting holes align with the sash.
- The installed bar extends far enough to engage the cam.
- The bar can rotate the cam without binding.
- The sash remains securely supported when tilted.
Manufacturing tolerances: Your measured dimensions may vary slightly from the nominal dimensions listed for a replacement. Use the complete set of measurements and physical features rather than expecting every decimal to match exactly.
What to Photograph for Part Identification
Clear photographs can help distinguish parts that share similar measurements.
Include photos of:
- The front, back, side, and top of the pivot lock shoe
- A close-up of the cam opening
- The complete pivot bar from both sides
- A close-up of the pivot-bar tip
- The mounting holes and screw locations
- Any numbers, logos, or markings
- The jamb channel where the shoe was installed
- The lower sash corner where the pivot bar was mounted
- The shoe and bar positioned beside a ruler
Common Measuring Mistakes
- Measuring only the shoe width and ignoring its thickness
- Including the cam housing in the shoe-body thickness
- Failing to measure an irregular cam opening on multiple sides
- Measuring the wrong portion of the pivot-bar tip
- Recording only the pivot bar’s overall length
- Ignoring mounting-hole spacing and offset
- Assuming all pivot bars are non-handed
- Choosing a shoe solely by cam color
- Rounding measurements too aggressively
- Using a stretched or damaged tape measure for small dimensions
- Discarding the original parts before confirming the replacements
- Failing to photograph the parts while still installed
Final Takeaway
To identify a pivot lock shoe, measure the shoe width, body thickness, and cam opening while documenting its overall profile and balance connection.
For the pivot bar, measure the cam-engaging tip, overall length, body width, mounting-hole pattern, and offset. The replacement parts must fit the jamb, sash, and each other.
Updated on 29 Jul 2026
What are your Feelings?
Thanks for your feedback.
Added to your cart:
** total_quantity ** | ** unit_price ** / ** unit_measure **
- (-)
Cart subtotal
$150.00 away from free shipping!