
Looking for help?
Find answers to your questions
- A Comprehensive Guide to Jalousie Window Hardware Repair
- Acorn Window Systems, Inc. OUT OF BUSINESS! Replacement Parts to Fix Those Old Windows
- Apex Extended Block and Tackle and Standard Block and Tackle Balances, Whats the Difference?
- Bifold Door Hardware: The Ultimate Guide to Choosing and Installing
- Comprehensive Guide to the Parts of a Window - Everything You Need to Know No BS!
- Custom Window Repair: Preserving the Elegance and Functionality of Residential Windows
- Decoding Spiral Window Balance Tip Colors for Optimal Window Support
- Do Picture Windows Have Weep Holes?
- Enhance Your Living Space with Crestline Patio Door Replacement Parts
- Enhancing Home Comfort: A Guide to Double Door Weatherseal Repair
- Enhancing Home Security with Double Hung Window Locks
- Enhancing Home Security: A Guide to Keyed Window Lock Repair
- Enhancing Your Home with JELD-WEN Patio Door Replacement Parts
- Fixed Windows vs. Operable Windows in Residential Window Repair: Understanding the Choice
- Fixing Stripped Casement Window Crank Hardware
- Graham Architectural Window Products: A Comprehensive Review
- How Does a Sash Lock Work?
- How Much Are Screens for Windows? A Comprehensive Guide
- Let There Be Light: Skylight Repair for Residential Windows
- Malta Windows: The Ultimate Guide to Choosing the Right Windows for Your Home
- Mastering Home Window Repair: A Guide to Balance Take Out Clips
- Maximize Your Closet Space with Durable and Stylish Sliding Closet Doors: A Comprehensive Guide
- Maximize Your Property Value with Expert Window Services from Window Repair Systems
- Protect Your Home with the Best Window Hardware: Locks, Latches, and Hinges
- Renewing Your Home: A Guide for Repairing Windows and Elevating with Window Blinds
- Residential Window Repair: Understanding Casement Window Hardware
- Restoring Beauty & History with Stained Glass Window Repair
- Restoring the Integrity of Your Home: Rotting Window Repair
- Soundproof Window Repair: Reviving Tranquility in Your Home
- The Importance of the Flared Pivot Bar in Window Hardware
- The Importance of Window Weight in Home Window Repair
- The Significance of Window Balance Shoes for Smooth Operations
- The Significance of Winged Guides in Block & Tackle Window Balances
- The Ultimate Guide to Basement Window Repair
- The Ultimate Guide to Door Weatherstripping: Find the Best Option for Your Home
- Tips to Safely Leave Your Windows Open at Night
- Traco Window Parts: Everything You Need to Know
- Understanding Coil Spring Window Balances: What is a Coil Stamp?
- Understanding Double Hung Window Sizes: Finding the Perfect Fit for Your Home
- Understanding Milgard Window Balances: A Comprehensive Guide
- Understanding Single Hung Window Sizes: A Comprehensive Guide
- Understanding Window Operator Types for Efficient Window Repair
- Vinyl Window Replacement Parts: The Key to Maintaining Function and Efficiency
- Weatherproofing Windows: A Comprehensive Guide to a Cozier Home
- Weatherstripping Guide: Improving Energy Efficiency in Your Home
- What Happens If You Cover Weep Holes? Hidden Dangers of Blocking Window Drainage
- What is a Casement Window? Improve Ventilation & Energy Efficiency
- What Is Window Glazing? A Look at Glazing Beads and Their Role in Windows
- Which Way Should Casement Windows Open? A Comprehensive Guide
- Which Way to Install Door Hinges: A Simple Guide for Beginners
- Window Hardware for Home Window Glass Repair
- Window Replacement Costs: A Comprehensive Guide to Understanding the Costs Involved
- Window Screen Repair Parts: The Ultimate Guide to Fixing Your Screens
- Architectural Specification Writing for Commercial Window Repair - Window Repair Systems
- Glazing Channels and Glazing Rubbers
- How to Determine the Length of a Window Balance without Having the Balance
- How to Identify & Fix Vinyl Tilt Windows with Inverted Block & Tackle Balances
- How to Measure Spiral Window Balances
- How to Remove Tilt Window Pivot Lock Shoes - Window Repair Systems
- How to Replace a Front Mount Casement Window Operator and Track
- How to Replace and Install Spiral Window Balances in a Tilt Window
- How to Replace Block and Tackle Window Balances
- How to Rescreen a Screen Door or Window Using a Screen Repair Kit - Window Repair Systems
- Jambliner Replacement for Pella Window, a How-To for a Tilt Window
- Jambliners for a Non-Tilt Window
- Jambliners for a Tilt Window
- Learn How to Assemble Window Hardware Direct's Replacement Tilt Jambliner Set!
- Pivot Lock Shoes
- Questions and Answers Ep. 1 - Window Repair Systems
- Questions and Answers Ep. 2 - A little SPRING in your Step!
- Replacing a Spiral Window Balance in a Non-Tilting Window
- Turbo2™ Window Balances
- Ultra Lift Window Balances
- Waldorf Astoria NYC - Stories From the Field Ep 1 - Window Repair Systems
- Weird Parts with Greg Ep. 1 - Gas Tube Window Balances - Window Repair Systems
- What Does the Stamp on a Block and Tackle Balance Mean?
- What is a Sash Cam and How to Select the Correct Sash Cam
- Window Security - Bandit Bar
- Window Sweep Locks and Keepers
-
Window Balances & Sash Support
- 77 Series Single Coil Spring Balance Assembly & Installation
- 96 Series Screw-In Constant Force Balance Assembly & Installation
- Caldwell Roller-Tilt Constant Force Balance Installation Instructions
- How to Determine the Length of a Window Balance from Sash Height
- How to Fix a Bowed Window Frame: A Step-by-Step Guide
- How to Fix a Crank Window That Won't Open: A Step-by-Step Guide
- How to Install Series 37 Quick-Tilt Coil Spring Window Balances Step by Step
- How to Lock a Hopper Window: A Simple Guide for Homeowners
- How to Lubricate Casement Windows: A Step-by-Step Guide
- How to Measure Block & Tackle Window Balances
- How to Measure Spiral Window Balances
- How to Remove a Double-Hung Window Sash
- How to Remove a Fixed Window Sash: A Step-by-Step Guide
- How To Remove Coil Spring Window Balances: Step by Step Guide
- How to Repair Awning Windows: A Step-by-Step Guide
- How to Replace Inverted Block and Tackle Balances
- How to Replace Non-Tilt Block and Tackle Window Balances
- How to Replace Non-Tilting Spiral Window Balances
- How to Replace Tilt Block and Tackle Balances
- How to Replace Tilting Spiral Window Balances
- S152 Series Screw-In Constant Force Balance Assembly and Installation
- DIY Window Tilt Latch Replacement: A Step-by-Step Guide
- How to Change Sliding Window Roller: A Step-by-Step Guide
- How to Measure Pivot Lock Shoes and Pivot Bars
- How To Measure Window Tilt Latches
- How to Open a Tilt Latch Window: A Step-by-Step Guide
- How to Replace a Front Mount Casement Window Operator and Track
- How to Replace Internal Tilt Latches in Your Windows: A Step-by-Step Guide
- How to Select Block and Tackle Balance Top and Bottom Guides
- Mastering the Art: How to Measure a 4-Bar Hinge for Windows
- What is a Window Sash Cam and How to Install a Sash Cam
- How to Fix a Door That Sticks: A Step-by-Step Guide
- How to Fix Sliding Screen Door Issues with Ease
- How to Replace a Patio Door Handle: A Step-by-Step Guide
- How to Replace a Patio Door Roller
- How to Replace Patio Door Lock: A Step-by-Step Guide
- How to Replace Rollers on an Aluminum Sliding Glass Door
- How to Adjust a Screen Door Closer: A Step-by-Step Guide
- How to Install a Screen Door Handle: Step-by-Step Guide
- How to Measure Window Screen Size: A Step-by-Step Guide
- How to Remove Window Screen with Plunger Pins: A Step-by-Step Guide
- How to Stop Condensation on a Storm Door: Effective Solutions
- Sealing the Gap: The Benefits of Door Sweeps and How to Install Them
- How to Install Door Insulation: Guide to a More Energy-Efficient Home
- How to Replace Weatherstripping on a Window or Door
How to Weigh a Window to get Sash Weight
How to Weigh a Window Sash to Determine Sash Weight
Sash weight is one of the most important pieces of information needed when selecting replacement window balances. The balances must provide enough support for the sash without making the window too difficult to close or allowing it to fall.
The most reliable method is to remove the sash and place it directly on a scale. When sash removal is not practical, the sash may sometimes be weighed while it remains inside the frame, but the balances must be fully disconnected and friction must be minimized.
On a double-hung window, the upper and lower sashes are separate moving panels and should be weighed individually. Do not combine their weights when selecting balances for either sash.
Before You Start
Tools and information you may need:
- Bathroom scale, shipping scale, or platform scale
- Original sash
- Phone or camera for reference photos
- Paper or notes app for recording the weight
- Small block or stable platform, when needed
- Work gloves and safety glasses
- A second person for a large or heavy sash
- Any balance stamps, markings, or identification numbers
Safety Warning: Window sashes may contain heavy glass and can shift unexpectedly when disconnected from their balances. Maintain control of both sides and ask for assistance when the sash is large, awkward, or difficult to remove.
Do not place your hands beneath an unsupported sash or allow the sash to drop onto the scale.
Why Sash Weight Matters
Window balances counteract the weight of a movable sash. Most vertically operating windows use one balance on each side.
The left and right balances work together as a pair. In a properly matched system, each balance supports approximately one-half of the total sash weight.
If the balances are too weak:
- The sash may fall or drift downward.
- The window may not remain open.
- The balances may wear out prematurely.
- The sash may move unevenly.
If the balances are too strong:
- The sash may be difficult to lower.
- The window may rise on its own.
- The sash may resist closing completely.
- Locks and meeting rails may become difficult to align.
Important: The sash weight helps determine the required balance capacity, but it does not identify the complete replacement by itself. Balance type, channel length, spring length, attachment style, guide configuration, and original markings may also be required.
Identify Which Sash You Are Weighing
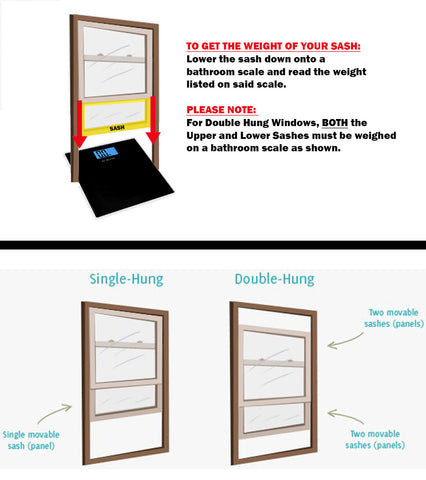
Before weighing anything, determine whether the window is single-hung or double-hung.
Single-hung window:
- Usually has one movable lower sash.
- The upper sash is normally fixed.
- Only the movable sash requires operating balances.
Double-hung window:
- Has movable upper and lower sashes.
- Each sash normally has its own balance pair.
- The upper and lower sashes must be weighed separately.
Label the recorded weight as upper sash or lower sash so the measurements are not confused later.
Step 1: Prepare and Check the Scale
- Place the scale on a firm, level floor.
- Do not use thick carpet or an uneven surface.
- Turn the scale on and confirm that it reads zero.
- Test it with an object of known weight when accuracy is uncertain.
- Confirm that the scale’s capacity is greater than the expected sash weight.
A scale that rocks, rests on carpet, or does not return to zero may produce an inaccurate reading.
Preferred Method: Remove and Weigh the Sash
Step 2: Remove the Sash Safely
The removal procedure depends on the window and balance style.
Common sash-removal systems include:
- Tilt sashes with tilt latches, pivot bars, and pivot lock shoes
- Non-tilt sashes using block and tackle balances and take-out clips
- Spiral-balance windows using brackets or pivot shoes
- Coil-balance windows using pivot bars and locking shoes
- Wood windows using removable jamb liners or sash cords
Follow the correct removal procedure for the window. Keep the sash level and support both sides throughout removal.
Place the removed sash on a padded surface until the scale is ready.
Step 3: Place the Sash on the Scale
- Confirm that the scale reads zero.
- Lift the sash with both hands.
- Center the sash on the scale.
- Make sure the complete weight is resting on the scale.
- Keep your hands on the sash only for balance, without lifting or pressing downward.
- Wait for the reading to stabilize.
- Record the weight immediately.
Keep your feet, knees, tools, and nearby objects from touching the sash or scale while the reading is taken.
Weighing a Large Sash on a Small Scale
A sash may be wider than the weighing surface of a bathroom scale.
- Place a rigid, stable board or platform across the scale.
- Confirm that the board does not touch the floor.
- Turn on or zero the scale with the board already in place when the scale supports that function.
- If the scale cannot be zeroed, weigh the board separately.
- Place the sash in the center of the board.
- Subtract the board’s weight from the combined reading when necessary.
The board must remain stable and transfer the entire load to the scale without contacting another surface.
Step 4: Confirm the Reading
- Remove the sash from the scale.
- Confirm that the scale returns to zero.
- Weigh the sash a second time.
- Compare the two readings.
- Repeat the process when the readings differ noticeably.
Record the confirmed weight rather than relying on a single quick reading.
Alternate Method: Weigh the Sash While It Remains in the Window
Use caution: This method is less reliable because jamb friction, weatherstripping, misalignment, partially connected balances, and contact with the frame can affect the reading.
Step 5: Disconnect Both Balances
Both the left and right balance systems must be completely disconnected from the sash before it can be weighed accurately.
Depending on the window, this may involve:
- Releasing block and tackle balances from sash cams
- Disconnecting spiral-balance brackets
- Removing pivot bars from pivot lock shoes
- Disconnecting coil-balance shoes or carriers
- Releasing sash cords or chains
Once disconnected, the sash will feel much heavier because the balances are no longer supporting it.
Step 6: Check for Friction and Obstructions
Inspect the sash and jamb before placing the scale beneath it.
Make sure the sash is not being supported or restricted by:
- A partially connected balance
- Tight weatherstripping
- Paint buildup
- Jamb liners or guide channels
- Locks, stops, or clips
- Dirt or debris inside the track
- A bowed frame
- A sash that is rubbing heavily on one side
Any upward friction or remaining balance tension may cause the scale to display less than the sash’s true weight.
Step 7: Place the Scale Beneath the Sash
- Raise the disconnected sash high enough to position the scale beneath it.
- Center the scale below the sash.
- Lower the sash slowly onto the scale.
- Keep both sides level.
- Do not press downward or lift upward while reading the scale.
- Allow the number to stabilize.
- Record the result.
Maintain control so the sash does not drop, tilt, twist, or slide off the scale.
Step 8: Evaluate the In-Frame Reading
Take the reading more than once and watch for inconsistent results.
A questionable reading may be indicated by:
- The number changing when the sash is moved slightly
- Different readings from repeated attempts
- The sash visibly rubbing against the jamb
- One side appearing lighter or higher than the other
- Remaining tension from a balance or cord
- The scale rocking or sitting unevenly
When the in-frame reading cannot be confirmed confidently, remove the sash and weigh it directly.
Weighing the Sashes in a Double-Hung Window
A double-hung window has separate balance systems for the upper and lower sashes.
- Remove and weigh the lower sash.
- Label the recorded weight as lower sash.
- Remove and weigh the upper sash separately.
- Label that result as upper sash.
- Record the balance markings associated with each sash.
Do not add the upper- and lower-sash weights together. Each sash requires a balance pair selected for its own weight.
Record the Weight Clearly
Record the full scale reading rather than rounding immediately to the nearest whole pound.
Include:
- Total sash weight
- Pounds and ounces, or pounds with a decimal
- Whether the weight belongs to the upper or lower sash
- Whether the sash was removed or weighed in place
- The type of scale used
- Any uncertainty caused by friction or limited access
When recording pounds and ounces, remember that 16 ounces equals one pound.
Preserve the original measurement in your notes even when a product chart groups the sash into a broader weight range.
How Sash Weight Relates to the Balance Pair
Vertically operating windows commonly use two balances—one on the left and one on the right.
Together, the pair supports the complete sash. Each balance generally contributes approximately half of the required support.
Do not divide the sash weight and then order a balance using only that number unless the product instructions specifically request capacity per balance. Many replacement charts list the sash-weight range supported by the complete balance pair.
Use the product chart as written: Confirm whether a published weight range refers to one balance or the installed pair. Do not assume all manufacturers label balance capacity the same way.
Record the Existing Balance Information
Sash weight should be documented with the original balance information whenever possible.
Record:
- Balance type
- Metal-channel or tube length
- Channel width and depth
- Spring length, when required
- Stamp, code, tip color, or coil marking
- Top and bottom guide style
- Shoe, bracket, hook, or clip configuration
- Left- and right-side orientation
- Photos of the complete original balance
What to Photograph for Balance Identification
Clear photos can help connect the sash weight to the correct balance system.
Include photos of:
- The complete window from the interior
- The sash removed from the opening
- The sash positioned on the scale
- The stabilized scale reading
- The complete balance from both sides
- All stamps, numbers, colors, and markings
- The upper and lower balance attachments
- The jamb where the balance was installed
- The sash connection point
Common Sash-Weighing Mistakes
- Using a scale on carpet or an uneven floor
- Failing to confirm that the scale reads zero
- Holding part of the sash weight while reading the scale
- Pressing downward on the sash
- Allowing the sash to touch the floor, wall, jamb, or another object
- Leaving one or both balances connected
- Ignoring jamb and weatherstripping friction
- Combining the upper- and lower-sash weights
- Forgetting to subtract the weight of a support board
- Rounding the result too aggressively
- Relying on one unstable reading
- Selecting a balance by sash weight alone
- Discarding the original balances before confirming replacements
Sash-Weight Checklist
Before selecting replacement balances, confirm:
- The correct movable sash has been identified.
- Upper and lower sashes were weighed separately.
- The scale was placed on a hard, level surface.
- The scale was checked for zero.
- The complete sash weight rested on the scale.
- The reading was confirmed at least twice.
- Any platform weight was removed from the result.
- The exact weight was recorded.
- The balance type and length were documented.
- All original balance stamps and attachments were photographed.
- The product chart’s weight-rating method was confirmed.
Final Takeaway
The most reliable way to determine sash weight is to remove the sash and place its complete weight on a level, properly zeroed scale.
When weighing a sash inside the frame, disconnect both balances and eliminate as much jamb friction as possible. Treat the result cautiously and repeat the measurement.
On a double-hung window, weigh the upper and lower sashes separately. Use the confirmed sash weight together with the balance type, length, stamp, attachment style, and manufacturer specifications to identify the correct replacements.
Updated on 29 Jul 2026
What are your Feelings?
Thanks for your feedback.
Added to your cart:
** total_quantity ** | ** unit_price ** / ** unit_measure **
- (-)
Cart subtotal
$150.00 away from free shipping!