
Looking for help?
Find answers to your questions
- A Comprehensive Guide to Jalousie Window Hardware Repair
- Acorn Window Systems, Inc. OUT OF BUSINESS! Replacement Parts to Fix Those Old Windows
- Apex Extended Block and Tackle and Standard Block and Tackle Balances, Whats the Difference?
- Bifold Door Hardware: The Ultimate Guide to Choosing and Installing
- Comprehensive Guide to the Parts of a Window - Everything You Need to Know No BS!
- Custom Window Repair: Preserving the Elegance and Functionality of Residential Windows
- Decoding Spiral Window Balance Tip Colors for Optimal Window Support
- Do Picture Windows Have Weep Holes?
- Enhance Your Living Space with Crestline Patio Door Replacement Parts
- Enhancing Home Comfort: A Guide to Double Door Weatherseal Repair
- Enhancing Home Security with Double Hung Window Locks
- Enhancing Home Security: A Guide to Keyed Window Lock Repair
- Enhancing Your Home with JELD-WEN Patio Door Replacement Parts
- Fixed Windows vs. Operable Windows in Residential Window Repair: Understanding the Choice
- Fixing Stripped Casement Window Crank Hardware
- Graham Architectural Window Products: A Comprehensive Review
- How Does a Sash Lock Work?
- How Much Are Screens for Windows? A Comprehensive Guide
- Let There Be Light: Skylight Repair for Residential Windows
- Malta Windows: The Ultimate Guide to Choosing the Right Windows for Your Home
- Mastering Home Window Repair: A Guide to Balance Take Out Clips
- Maximize Your Closet Space with Durable and Stylish Sliding Closet Doors: A Comprehensive Guide
- Maximize Your Property Value with Expert Window Services from Window Repair Systems
- Protect Your Home with the Best Window Hardware: Locks, Latches, and Hinges
- Renewing Your Home: A Guide for Repairing Windows and Elevating with Window Blinds
- Residential Window Repair: Understanding Casement Window Hardware
- Restoring Beauty & History with Stained Glass Window Repair
- Restoring the Integrity of Your Home: Rotting Window Repair
- Soundproof Window Repair: Reviving Tranquility in Your Home
- The Importance of the Flared Pivot Bar in Window Hardware
- The Importance of Window Weight in Home Window Repair
- The Significance of Window Balance Shoes for Smooth Operations
- The Significance of Winged Guides in Block & Tackle Window Balances
- The Ultimate Guide to Basement Window Repair
- The Ultimate Guide to Door Weatherstripping: Find the Best Option for Your Home
- Tips to Safely Leave Your Windows Open at Night
- Traco Window Parts: Everything You Need to Know
- Understanding Coil Spring Window Balances: What is a Coil Stamp?
- Understanding Double Hung Window Sizes: Finding the Perfect Fit for Your Home
- Understanding Milgard Window Balances: A Comprehensive Guide
- Understanding Single Hung Window Sizes: A Comprehensive Guide
- Understanding Window Operator Types for Efficient Window Repair
- Vinyl Window Replacement Parts: The Key to Maintaining Function and Efficiency
- Weatherproofing Windows: A Comprehensive Guide to a Cozier Home
- Weatherstripping Guide: Improving Energy Efficiency in Your Home
- What Happens If You Cover Weep Holes? Hidden Dangers of Blocking Window Drainage
- What is a Casement Window? Improve Ventilation & Energy Efficiency
- What Is Window Glazing? A Look at Glazing Beads and Their Role in Windows
- Which Way Should Casement Windows Open? A Comprehensive Guide
- Which Way to Install Door Hinges: A Simple Guide for Beginners
- Window Hardware for Home Window Glass Repair
- Window Replacement Costs: A Comprehensive Guide to Understanding the Costs Involved
- Window Screen Repair Parts: The Ultimate Guide to Fixing Your Screens
- Architectural Specification Writing for Commercial Window Repair - Window Repair Systems
- Glazing Channels and Glazing Rubbers
- How to Determine the Length of a Window Balance without Having the Balance
- How to Identify & Fix Vinyl Tilt Windows with Inverted Block & Tackle Balances
- How to Measure Spiral Window Balances
- How to Remove Tilt Window Pivot Lock Shoes - Window Repair Systems
- How to Replace a Front Mount Casement Window Operator and Track
- How to Replace and Install Spiral Window Balances in a Tilt Window
- How to Replace Block and Tackle Window Balances
- How to Rescreen a Screen Door or Window Using a Screen Repair Kit - Window Repair Systems
- Jambliner Replacement for Pella Window, a How-To for a Tilt Window
- Jambliners for a Non-Tilt Window
- Jambliners for a Tilt Window
- Learn How to Assemble Window Hardware Direct's Replacement Tilt Jambliner Set!
- Pivot Lock Shoes
- Questions and Answers Ep. 1 - Window Repair Systems
- Questions and Answers Ep. 2 - A little SPRING in your Step!
- Replacing a Spiral Window Balance in a Non-Tilting Window
- Turbo2™ Window Balances
- Ultra Lift Window Balances
- Waldorf Astoria NYC - Stories From the Field Ep 1 - Window Repair Systems
- Weird Parts with Greg Ep. 1 - Gas Tube Window Balances - Window Repair Systems
- What Does the Stamp on a Block and Tackle Balance Mean?
- What is a Sash Cam and How to Select the Correct Sash Cam
- Window Security - Bandit Bar
- Window Sweep Locks and Keepers
-
Window Balances & Sash Support
- 77 Series Single Coil Spring Balance Assembly & Installation
- 96 Series Screw-In Constant Force Balance Assembly & Installation
- Caldwell Roller-Tilt Constant Force Balance Installation Instructions
- How to Determine the Length of a Window Balance from Sash Height
- How to Fix a Bowed Window Frame: A Step-by-Step Guide
- How to Fix a Crank Window That Won't Open: A Step-by-Step Guide
- How to Install Series 37 Quick-Tilt Coil Spring Window Balances Step by Step
- How to Lock a Hopper Window: A Simple Guide for Homeowners
- How to Lubricate Casement Windows: A Step-by-Step Guide
- How to Measure Block & Tackle Window Balances
- How to Measure Spiral Window Balances
- How to Remove a Double-Hung Window Sash
- How to Remove a Fixed Window Sash: A Step-by-Step Guide
- How To Remove Coil Spring Window Balances: Step by Step Guide
- How to Repair Awning Windows: A Step-by-Step Guide
- How to Replace Inverted Block and Tackle Balances
- How to Replace Non-Tilt Block and Tackle Window Balances
- How to Replace Non-Tilting Spiral Window Balances
- How to Replace Tilt Block and Tackle Balances
- How to Replace Tilting Spiral Window Balances
- S152 Series Screw-In Constant Force Balance Assembly and Installation
- DIY Window Tilt Latch Replacement: A Step-by-Step Guide
- How to Change Sliding Window Roller: A Step-by-Step Guide
- How to Measure Pivot Lock Shoes and Pivot Bars
- How To Measure Window Tilt Latches
- How to Open a Tilt Latch Window: A Step-by-Step Guide
- How to Replace a Front Mount Casement Window Operator and Track
- How to Replace Internal Tilt Latches in Your Windows: A Step-by-Step Guide
- How to Select Block and Tackle Balance Top and Bottom Guides
- Mastering the Art: How to Measure a 4-Bar Hinge for Windows
- What is a Window Sash Cam and How to Install a Sash Cam
- How to Fix a Door That Sticks: A Step-by-Step Guide
- How to Fix Sliding Screen Door Issues with Ease
- How to Replace a Patio Door Handle: A Step-by-Step Guide
- How to Replace a Patio Door Roller
- How to Replace Patio Door Lock: A Step-by-Step Guide
- How to Replace Rollers on an Aluminum Sliding Glass Door
- How to Adjust a Screen Door Closer: A Step-by-Step Guide
- How to Install a Screen Door Handle: Step-by-Step Guide
- How to Measure Window Screen Size: A Step-by-Step Guide
- How to Remove Window Screen with Plunger Pins: A Step-by-Step Guide
- How to Stop Condensation on a Storm Door: Effective Solutions
- Sealing the Gap: The Benefits of Door Sweeps and How to Install Them
- How to Install Door Insulation: Guide to a More Energy-Efficient Home
- How to Replace Weatherstripping on a Window or Door
S152 Series Screw-In Constant Force Balance Assembly and Installation
S152 Series Screw-In Constant Force Balance Assembly and Installation
The S152 Series screw-in constant-force balance uses one or more stainless-steel coil springs, a pivot lock shoe, and a protective balance cover to support the sash in a tilt window.
This guide covers the assembly and installation of common single, tandem, and triple screw-in constant-force balance configurations. The exact number and weight rating of the coils must match the original window application.
Photograph the original balance, coil arrangement, pivot lock shoe, cover, mounting location, and sash hardware before removing or separating any parts.
Before You Start
Parts and tools you may need:
- Correct S152 Series coil spring or springs
- Compatible pivot lock shoe
- Matching balance cover or housing
- Correct retaining and mounting screws
- Phillips-head screwdriver
- Flat-head screwdriver
- Safety glasses
- Cut-resistant work gloves
- Phone or camera for reference photos

Safety Warning: Constant-force coils contain stored spring tension and may have sharp metal edges. Wear eye and hand protection, keep each coil controlled, and do not allow a spring to unwind suddenly.
Do not bend, flatten, cut, or unroll the coil. Stop if the assembly, mounting method, or original coil arrangement is unclear.
Confirm the Correct Replacement Parts
Constant-force balance components that appear similar may differ in coil width, spring rating, shoe dimensions, cam style, housing shape, and mounting-hole location.
Compare the replacement with the original and record:
- The stamp or weight rating on each coil
- The number of coils used on each side
- Single, tandem, or triple configuration
- The order in which multiple coils are stacked
- Coil width and attachment-hole position
- Pivot lock shoe dimensions and profile
- Metal cam shape and orientation
- Balance-cover style and mounting location
- Original screw sizes and positions
The left and right balance assemblies should use matching configurations and provide the correct combined support for the sash.
Assembly Instructions
Step 1: Align the Coil Springs

Arrange the coil springs in the same order and direction as the original balance.
- Place the lower coil in position beside the pivot lock shoe.
- For a tandem or triple assembly, position the next coil above it.
- Line up the attachment holes in the stacked coils.
- Confirm that the coils face the same direction as the original assembly.
The outer end of the upper coil may need to be moved outward slightly so the attachment holes remain aligned. Do not crease or sharply bend the spring.
Step 2: Align the Coils with the Pivot Lock Shoe

Position the aligned coil holes over the attachment hole in the pivot lock shoe.
- Keep the coil stack controlled with one hand.
- Align the coil holes with the screw opening in the shoe.
- Insert the retaining screw far enough to hold the coils in position.
- Confirm that no coil has shifted or twisted.
The screw should pass through the complete coil stack and engage the intended attachment point in the shoe.
Step 3: Secure the Coils to the Shoe

Tighten the retaining screw through the pivot lock shoe to secure the coil springs.
For the assembly shown in the original WHD instructions, the recommended screw is a #6 screw approximately 1/2 to 3/4 inch long. Confirm the correct length for the actual shoe and number of coils being assembled.
Tighten the screw securely without stripping the shoe or crushing the coil stack. The coils should remain aligned and able to roll into their normal operating position.
Important: The screw visible in the original demonstration image is oversized and should not be used as a sizing reference.
Step 4: Fit the Balance Cover Around the Coils

Position the balance cover or housing around the coil springs in the same orientation as the original assembly.
- Keep the coils rolled and controlled.
- Fit the cover around the outside of the coil stack.
- Confirm that each coil is seated within the cover.
- Align the front mounting hole with the original installation direction.
- Make sure the shoe can move beneath the assembled balance.
The housing should contain and guide the coils without pinching their edges or forcing them out of alignment.
Installation Instructions
Step 5: Position the Assembly in the Jamb
Insert the completed balance assembly into the same jamb pocket or mounting position used by the original balance.
- Orient the cover, coils, and pivot lock shoe correctly.
- Place the shoe into the jamb track.
- Position the balance cover against the original mounting surface.
- Make sure the shoe can travel vertically without binding.
- Confirm that the assembly is not reversed or twisted.
Step 6: Secure the Balance Cover to the Jamb

Insert the mounting screw through the hole in the front of the balance cover and secure the assembly at the original jamb location.
- Align the cover with the original mounting hole.
- Install the correct screw through the cover.
- Tighten the screw until the assembly is secure.
- Do not overtighten the screw in vinyl or weakened jamb material.
- Confirm that the cover sits flat and does not interfere with the sash.
Repeat the assembly and mounting procedure for the balance on the opposite side of the window.
Step 7: Pull Down and Lock the Pivot Shoes
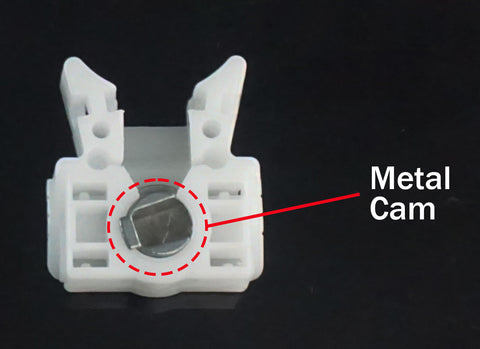
Use a flat-head screwdriver to control and position each pivot lock shoe.
- Insert the screwdriver securely into the metal cam.
- Rotate the cam to unlock the shoe while maintaining control.
- Pull the shoe downward approximately 6 to 8 inches.
- Rotate the cam back into the locked position.
- Repeat on the opposite side.
Position the left and right shoes at approximately the same height before reinstalling the sash.
One shoe may be placed slightly higher temporarily to make seating the two pivot bars easier.
Maintain control: The connected coils can pull the shoe upward rapidly whenever the cam is unlocked.
Step 8: Reinstall the Window Sash
- Hold the sash nearly horizontal with the top tilted toward you.
- Insert the first sash pivot bar into the cam of one pivot lock shoe.
- Angle the sash slightly and insert the opposite pivot bar.
- Confirm that both pivot bars are fully seated.
- Level the sash before tilting it upward.
- Raise the sash into the frame until both tilt latches engage.
- Lower the sash gently.
Do not force the pivot bars into the shoes. Recheck the shoe height, cam position, and pivot-bar alignment if either side will not seat correctly.
Step 9: Test the Balance Installation
Raise and lower the sash slowly several times after installation.
Confirm that the sash:
- Moves smoothly and evenly
- Remains open at several positions
- Does not drift downward or rise on its own
- Does not bind against either jamb
- Remains level while moving
- Closes completely
- Locks correctly
- Remains securely connected to both pivot shoes
Inspect the Related Hardware
A worn coil may not be the only damaged component. Inspect the complete balance and sash-support system.
- Cracked or distorted pivot lock shoes
- Worn or damaged metal cams
- Bent, loose, or broken sash pivot bars
- Torn, stretched, separated, or corroded coils
- Cracked or damaged balance covers
- Loose retaining or mounting screws
- Damaged jamb tracks
- Cracked sash corners
- Uneven wear between the left and right assemblies
Common Assembly and Installation Mistakes
- Installing coils with the wrong weight rating
- Changing the original number or stacking order of the coils
- Reversing the direction of a coil
- Creasing, flattening, or unrolling the spring
- Using an oversized retaining screw
- Failing to pass the screw through every coil in the stack
- Pinching a coil inside the balance cover
- Mounting the cover in the wrong location or orientation
- Unlocking the shoe without controlling it
- Positioning the two shoes at significantly different heights
- Allowing the sash to hang from one pivot bar
- Forcing the pivot bars into the shoe cams
- Discarding the original hardware before testing the replacement
Final Takeaway
Assembling an S152 Series balance requires aligning the correct coil springs, securing them to the pivot lock shoe, fitting the cover around the coil stack, and mounting the completed assembly in its original jamb position.
Keep the springs and pivot shoes controlled throughout the process, position both shoes evenly, and test the sash slowly after installation.
Updated on 23 Jul 2026
What are your Feelings?
Thanks for your feedback.
Added to your cart:
** total_quantity ** | ** unit_price ** / ** unit_measure **
- (-)
Cart subtotal