
Looking for help?
Find answers to your questions
What is a Window Sash Cam and How to Install a Sash Cam
What Is a Window Sash Cam and How Do You Install One?
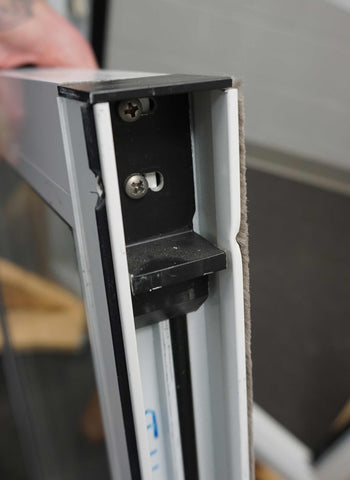
A window sash cam is a small plastic or metal component installed near the upper corners of a non-tilt window sash. It rests on the top guide of a block and tackle balance, allowing the balance to support the sash as it moves inside the jamb.
Although sash cams are small, their size and shape affect how the sash sits on the balances. A cam that is too wide, too narrow, too shallow, or too deep may prevent the sash from moving correctly or cause it to disengage from the balance.
This guide explains how sash cams work, how to compare the original part with a replacement, and how to remove and install a typical screw-mounted sash cam.
Before You Start
Tools and materials you may need:
- Phillips or flat-head screwdriver
- Tape measure, ruler, or digital caliper
- Replacement sash cams
- Small container for screws
- Phone or camera for reference photos
- Paper or notes app for recording measurements
- Padded work surface
- Safety glasses and work gloves
- A second person for a large or heavy sash
Safety Warning: A window sash can be heavier than it appears. Maintain control while removing it from the frame, and place it on a stable padded surface before replacing the cams.
Do not pry against the glass, glazing bead, or thin sash walls.
What Is a Window Sash Cam?
A sash cam is mounted near the upper side of a movable sash. When the sash is installed, each cam rests on the top guide of a block and tackle balance.
The sash cams help:
- Transfer the weight of the sash to the balances
- Keep the sash positioned between the balances
- Guide the sash as it moves inside the jamb
- Maintain the correct relationship between the sash and balance top guides
- Prevent the sash from slipping past or disengaging from the balances
Sash cams are most commonly associated with non-tilt windows using block and tackle balances. Tilt windows normally connect to their balances through pivot bars and pivot lock shoes instead.
Where Are Sash Cams Located?

Sash cams are normally installed at the upper left and upper right sides of the movable sash.
Depending on the window design, the complete cam may be visible from the side, or part of it may fit inside the hollow sash profile.
Look for:
- A small plastic or metal component at each upper sash corner
- One or more visible mounting screws
- A projecting lower ledge that rests on the balance guide
- A body that fits inside or alongside the sash channel
The arrows in the image indicate the typical locations of the two sash cams.
How a Sash Cam Works with the Window Balance
The balance is positioned inside the window jamb. Its top guide sits beneath the sash cam.
As the sash is raised, the cam remains supported by the top guide while the balance spring and pulley system help counteract the sash weight.
When the sash is lowered, the balance continues supporting it and helps control its movement.
The cam must sit squarely on the balance guide. An incorrect cam depth or shape may allow the sash to sit too far inward, too far outward, or too low on the guide.
Signs of a Broken or Incorrect Sash Cam
A damaged or mismatched sash cam may cause several operating problems.
- The sash drops or will not remain open
- One side of the sash sits lower than the other
- The sash rubs or binds inside the jamb
- The sash slips past the balance top guide
- The balance moves without supporting the sash
- The cam is cracked, worn, bent, or missing
- The mounting screw no longer holds the cam securely
- The sash moves unevenly or twists during operation
- The window will not close or lock correctly
Check the complete system: A sash-support problem may also be caused by a broken balance cord, weak balance spring, damaged top guide, bent channel, or incorrect balance weight rating.
How to Select the Correct Sash Cam
Step 1: Document the Original Cam
Take photos before removing the sash cam.
Photograph:
- The complete cam while installed
- The side and front profile
- The lower ledge that contacts the balance guide
- The mounting screws and holes
- The left- and right-side orientations
- The balance top guide beneath the cam
- Any molded numbers, logos, or markings
Step 2: Determine Whether the Cam Is Handed
Many sash cams are supplied as matching left- and right-hand parts.
Record:
- Which cam came from the left side of the sash
- Which cam came from the right side
- The direction of the balance-support ledge
- The location of the mounting holes
- The interior and exterior sash orientation
Do not assume one cam can be turned around and used on the opposite side. The body, mounting holes, and support ledge may be mirrored.
Step 3: Measure the Sash Cam Width
Measure across the widest portion of the cam body that fits inside or against the sash channel.
- Remove dirt or broken material from the original cam.
- Place the cam on a flat surface.
- Measure from one outer side to the other.
- Record any projecting tabs or ledges separately.
- Measure the interior sash opening where the cam fits.
The cam should fit securely without forcing the sash walls apart or moving excessively from side to side.
Step 4: Measure the Cam Depth
Measure how far the cam extends from the sash and how deep its body fits into the sash profile.
Record:
- Overall cam depth
- Body depth inside the sash
- Projection of the balance-support ledge
- Distance from the sash surface to the balance-contact point
- Any step, offset, or recessed portion
Incorrect depth can cause the sash to sit improperly on the balance top guide or bind against the frame.
Step 5: Measure the Height and Complete Profile
Measure the cam from its uppermost point to its lowest projecting edge.
Also compare:
- Overall body height
- Length and thickness of the lower support ledge
- Square, rounded, tapered, or stepped body shape
- Openings or slots through the body
- Raised ribs or sash-engagement tabs
- Flat or angled balance-contact surface
- Plastic or metal construction
Step 6: Measure the Mounting-Hole Pattern
Record the number, size, and location of the mounting holes.
Measure:
- Center-to-center spacing when two holes are used
- Distance from each hole center to the nearest cam edge
- Approximate hole diameter
- Countersunk, slotted, or round hole shape
- Original screw size and head style
A cam with matching overall dimensions may still be incompatible if its mounting hole does not align with the sash.
Step 7: Compare the Cam with the Balance Top Guide
The lower section of the sash cam must rest securely on the balance top guide.
Confirm that:
- The cam ledge is wide enough to rest on the guide
- The cam does not interfere with the guide wings
- The cam sits at the correct depth inside the jamb
- The balance remains centered beneath the sash
- The sash can move without rubbing against the balance channel
- The cam cannot slip past the guide during normal operation
Compare the original cam and guide together whenever possible rather than identifying each part independently.
How to Replace a Window Sash Cam
Step 8: Remove the Window Sash
The exact removal method depends on the window design. Many non-tilt sashes are removed using balance take-out clips.
- Unlock the window.
- Open the sash enough to access the balance take-out clips.
- Engage the clips according to the window design.
- Raise the sash above the balance guides.
- Move the sash sideways as required to clear the jamb.
- Remove the sash while maintaining control of both sides.
- Place it on a padded work surface.
Refer to the window manufacturer’s instructions when the sash does not use a standard take-out-clip removal method.
Do not force the sash: Stop if it remains connected to the balances, catches on the jamb, or begins to twist.
Step 9: Remove the Original Sash Cam
- Locate the cam near the upper side of the sash.
- Photograph its installed orientation.
- Remove the mounting screw or screws.
- Pull or slide the cam out of the sash profile.
- Keep the original screws for comparison.
- Label the cam as left or right.
If the cam does not move, look for another mounting screw, a retaining tab, paint, or broken plastic inside the sash channel.
Do not enlarge the opening or pry aggressively against the sash.
Step 10: Clean and Inspect the Mounting Area
Remove loose dirt and broken cam fragments from the sash channel.
Inspect for:
- Cracks around the sash opening
- Stripped or enlarged screw holes
- Bent sash walls
- Broken plastic trapped in the channel
- Damage caused by the balance top guide
- Corrosion around the mounting point
Step 11: Compare the Replacement with the Original
Place the original and replacement cams beside each other before installation.
Confirm that the replacement has:
- Matching left- or right-hand orientation
- Compatible width, depth, and height
- The same lower support ledge profile
- A matching mounting-hole location
- Enough clearance to fit inside the sash
- A compatible balance-guide contact surface
- Matching tabs, slots, offsets, or retaining features
Step 12: Install the New Sash Cam
- Orient the new cam the same way as the original.
- Insert or position it inside the sash channel.
- Align the mounting hole with the original screw location.
- Start the screw by hand.
- Tighten it only until the cam is secure.
- Repeat the process on the opposite side when replacing both cams.
The cam should sit flat and remain firmly positioned without distorting the sash.
Do not overtighten: Excessive force may crack a plastic sash cam, strip the mounting hole, or deform the sash profile.
Should Both Sash Cams Be Replaced?
Replacing both sash cams at the same time is generally recommended when they are the same age or sold as a matching pair.
This helps ensure:
- Equal cam height on both sides
- Matching depth and guide engagement
- Even sash support
- Consistent wear and movement
- Correct left- and right-hand pairing
Step 13: Reinstall the Window Sash
- Hold the sash level with both hands.
- Position it between the window jambs.
- Align each sash cam above its balance top guide.
- Lower both cams onto the guides evenly.
- Return the sash to its normal operating track.
- Release or reset the balance take-out clips.
Confirm visually that each sash cam is resting securely on its corresponding balance guide before operating the window.
Step 14: Test the Window
- Raise the sash slowly several inches.
- Watch both sides for even movement.
- Lower the sash and check for binding.
- Continue through the full normal operating range.
- Confirm that the sash remains open at several heights.
- Close the sash completely.
- Test the sash lock and keeper.
The repair is complete when:
- Both cams remain on the balance guides
- The sash travels evenly
- The balances support the sash
- The sash does not rub or twist
- The window closes and locks normally
Troubleshooting After Installation
The Cam Does Not Fit Inside the Sash
- Compare the body width and depth with the original.
- Check for broken plastic or debris inside the channel.
- Confirm that the correct left- or right-hand cam is being used.
- Look for tabs or ribs that do not match the sash profile.
The Mounting Hole Does Not Align
- Compare the hole location with the original cam.
- Confirm that the cam is fully seated.
- Check whether the replacement is reversed.
- Do not drill a new hole until compatibility is confirmed.
The Sash Will Not Sit on the Balance Guide
- Compare the cam depth and support ledge.
- Confirm that the balance guide is not broken.
- Check whether the balance is installed at the correct height.
- Make sure the sash is centered inside the jamb.
One Side of the Sash Drops
- Confirm that both cams are resting on their guides.
- Inspect the balance cord and pulley on the dropping side.
- Check for a broken or weak balance.
- Verify that both balances have the correct weight rating.
Common Sash Cam Replacement Mistakes
- Ordering by appearance or color alone
- Ignoring the left- and right-hand orientation
- Measuring only the overall height
- Failing to compare cam width and depth
- Ignoring the lower balance-support ledge
- Failing to measure the mounting-hole location
- Using a cam that does not match the balance top guide
- Removing the sash without controlling its weight
- Forcing the cam into the sash channel
- Overtightening the mounting screw
- Installing the sash without confirming guide engagement
- Assuming a failed balance is only a cam problem
- Discarding the original cams before testing the replacements
Watch: Sash Cam Identification and Selection
Final Takeaway
A sash cam connects a non-tilt window sash to the top guide of a block and tackle balance, allowing the balance to support the sash during operation.
Match the original cam’s width, depth, height, support ledge, handing, mounting-hole position, and complete profile before selecting a replacement.
After installation, confirm that both cams rest securely on the balance guides and that the sash moves evenly, remains supported, closes, and locks normally.